
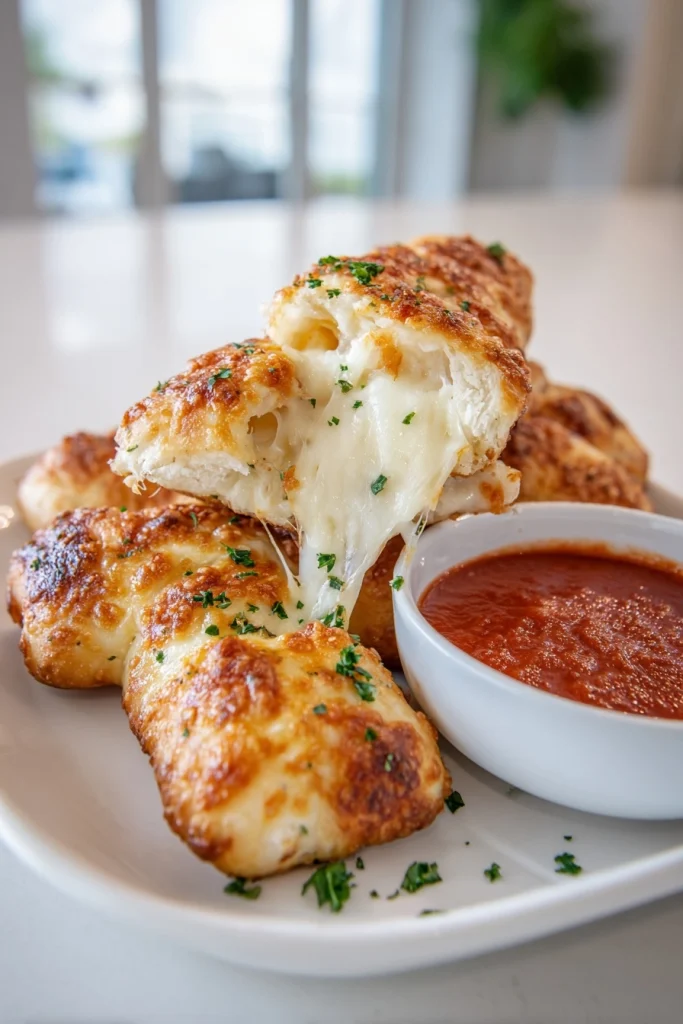
Introduction to Homemade Cheesy Breadsticks
As a busy mom, I know how precious time can be, especially when it comes to meal prep. That’s why I absolutely adore these Homemade Cheesy Breadsticks. They’re not just easy to whip up; they’re also a delightful treat that everyone in the family will love. Imagine the aroma of warm, cheesy goodness wafting through your kitchen, making your loved ones gather around the table. Whether it’s a quick snack after school or a side for dinner, these breadsticks are the perfect solution for any occasion. Trust me, they’ll disappear faster than you can say “cheesy!”
Why You’ll Love This Homemade Cheesy Breadsticks
These Homemade Cheesy Breadsticks are a game-changer for busy days. They come together in no time, making them perfect for those evenings when you need a quick meal. The taste? Oh, it’s like a warm hug for your taste buds! With gooey cheese and a hint of garlic, they’re irresistible. Plus, they’re a hit with kids and adults alike, making family dinners a breeze. You’ll find yourself making these again and again!
Ingredients for Homemade Cheesy Breadsticks
Gathering the right ingredients is the first step to creating these delightful Homemade Cheesy Breadsticks. Here’s what you’ll need:
- All-purpose flour: This is the base of your dough, giving it structure and chewiness.
- Sugar: Just a touch to help activate the yeast and add a hint of sweetness.
- Salt: Essential for flavor, it enhances the overall taste of the breadsticks.
- Active dry yeast: This little powerhouse makes your dough rise, creating that fluffy texture we all love.
- Warm water: Helps activate the yeast; make sure it’s not too hot or too cold!
- Olive oil: Adds richness and helps keep the breadsticks tender.
- Shredded mozzarella cheese: The star of the show! It melts beautifully and gives that gooey texture.
- Grated Parmesan cheese: Adds a sharp, nutty flavor that complements the mozzarella perfectly.
- Garlic powder: A sprinkle of this brings a savory depth to your breadsticks.
- Italian seasoning: A blend of herbs that adds a delightful aroma and flavor.
For those who like to experiment, consider adding herbs or spices to the dough for an extra flavor boost. You can also swap out the cheeses for your favorites or use whole wheat flour for a healthier twist. The exact quantities for each ingredient are listed at the bottom of the article, ready for you to print and take to the kitchen!
How to Make Homemade Cheesy Breadsticks
Now that you have your ingredients ready, let’s dive into the fun part: making these Homemade Cheesy Breadsticks! Follow these simple steps, and you’ll have a delicious treat in no time.
Step 1: Prepare the Yeast Mixture
Start by combining warm water, sugar, and active dry yeast in a bowl. Stir gently and let it sit for about 5 minutes. You want to see it become frothy, like a bubbly potion! This means your yeast is alive and ready to work its magic.
Step 2: Make the Dough
Once your yeast mixture is frothy, it’s time to add the all-purpose flour, salt, and olive oil. Mix everything together until a dough starts to form. Don’t worry if it looks a bit messy at first; that’s part of the fun! Just keep mixing until it all comes together.
Step 3: Knead the Dough
Now, sprinkle some flour on your countertop and turn the dough out onto it. Knead the dough for about 5 minutes. You want it to be smooth and elastic, like a soft pillow. If it’s too sticky, add a little more flour as you go. This step is great for relieving stress, too!
Step 4: Let the Dough Rise
Place your kneaded dough in a greased bowl and cover it with a clean kitchen towel. Let it rise in a warm spot for about 1 hour, or until it doubles in size. This is where the magic happens! You’ll see it puff up, ready to become those cheesy delights.
Step 5: Preheat the Oven
While your dough is rising, preheat your oven to 400°F (200°C). This step is crucial for getting that perfect golden-brown crust on your breadsticks. Trust me, you don’t want to skip this part!
Step 6: Roll Out the Dough
Once the dough has risen, turn it out onto a floured surface again. Roll it out into a rectangle, about 1/2 inch thick. Don’t stress about making it perfect; a little rustic charm adds character to your Homemade Cheesy Breadsticks.
Step 7: Add the Cheese and Seasoning
Now comes the fun part! Sprinkle the shredded mozzarella and grated Parmesan cheese evenly over the dough. Then, add a dash of garlic powder and Italian seasoning. The aroma will make your mouth water! Feel free to get creative with the toppings if you like.
Step 8: Cut and Bake
Using a sharp knife or pizza cutter, cut the dough into strips. Place them on a baking sheet lined with parchment paper. Bake in your preheated oven for 15-20 minutes, or until they’re golden brown and bubbly. Your kitchen will smell heavenly, and you’ll be counting down the minutes until you can dig in!
Tips for Success
- Make sure your water is warm, not hot, to activate the yeast properly.
- Don’t rush the rising time; it’s essential for fluffy breadsticks.
- Experiment with different cheeses for unique flavors.
- Use a pizza cutter for easy and even strips.
- Serve immediately for the best cheesy experience!
Equipment Needed
- Mixing bowl: A large bowl for combining ingredients. A sturdy pot works too!
- Measuring cups and spoons: Essential for accuracy. You can use a kitchen scale if you prefer.
- Rolling pin: For rolling out the dough. A wine bottle can do the trick in a pinch!
- Baking sheet: A flat surface for baking. Line it with parchment paper for easy cleanup.
- Sharp knife or pizza cutter: For cutting the dough into strips. Scissors can work in a hurry!
Variations of Homemade Cheesy Breadsticks
- Herb-Infused Dough: Add fresh or dried herbs like rosemary or thyme to the dough for an aromatic twist.
- Spicy Kick: Mix in some crushed red pepper flakes or jalapeños for a spicy version that packs a punch.
- Cheesy Garlic Breadsticks: Increase the garlic powder and add minced fresh garlic for an extra garlicky flavor.
- Whole Wheat Option: Substitute half of the all-purpose flour with whole wheat flour for a healthier alternative.
- Cheese Lovers: Experiment with different cheeses like cheddar, gouda, or feta for unique flavor profiles.
- Vegan Version: Use plant-based cheese and substitute olive oil with coconut oil for a dairy-free treat.
Serving Suggestions for Homemade Cheesy Breadsticks
- Pair with marinara sauce for a classic dipping experience.
- Serve alongside a fresh garden salad for a balanced meal.
- Enjoy with a glass of red wine for a cozy evening.
- Present on a wooden board for a rustic touch.
- Sprinkle with fresh herbs before serving for added flair.
FAQs about Homemade Cheesy Breadsticks
As you embark on your journey to make these Homemade Cheesy Breadsticks, you might have a few questions. Here are some common queries I’ve encountered, along with helpful answers!
Can I make the dough ahead of time?
Absolutely! You can prepare the dough and let it rise, then refrigerate it for up to 24 hours. Just bring it back to room temperature before rolling it out.
What can I serve with these cheesy breadsticks?
These cheesy breadsticks pair wonderfully with marinara sauce, garlic butter, or even a creamy ranch dip. They’re perfect for snacking or as a side dish!
Can I freeze the breadsticks?
Yes, you can freeze them! After baking, let them cool completely, then wrap them tightly in plastic wrap and store in an airtight container. They’ll last for up to 3 months.
How do I reheat leftover breadsticks?
To reheat, simply pop them in a preheated oven at 350°F (175°C) for about 10 minutes. This will help restore their crispy texture!
Can I use whole wheat flour instead of all-purpose flour?
Yes, you can! Just keep in mind that the texture may be denser. You might want to mix half whole wheat and half all-purpose flour for the best results.
Final Thoughts
Making Homemade Cheesy Breadsticks is more than just a cooking task; it’s a delightful experience that brings joy to your kitchen. The aroma of freshly baked breadsticks fills the air, creating a warm and inviting atmosphere. Watching your family gather around, eagerly waiting to dig in, is a heartwarming sight. These cheesy delights are perfect for any occasion, whether it’s a cozy family dinner or a fun gathering with friends. I hope this recipe becomes a cherished part of your culinary adventures, bringing smiles and satisfaction to your loved ones, just as it has for mine!
PrintHomemade Cheesy Breadsticks that Everyone Will Love!
Delicious homemade cheesy breadsticks that are easy to make and perfect for sharing.
- Prep Time: 15 minutes
- Cook Time: 20 minutes
- Total Time: 1 hour 35 minutes
- Yield: 12 breadsticks 1x
- Category: Appetizer
- Method: Baking
- Cuisine: Italian
- Diet: Vegetarian
Ingredients
- 2 cups all-purpose flour
- 1 tablespoon sugar
- 1 teaspoon salt
- 1 tablespoon active dry yeast
- 3/4 cup warm water
- 2 tablespoons olive oil
- 1 cup shredded mozzarella cheese
- 1/2 cup grated Parmesan cheese
- 1 teaspoon garlic powder
- 1 teaspoon Italian seasoning
Instructions
- In a bowl, combine warm water, sugar, and yeast. Let it sit for 5 minutes until frothy.
- Add flour, salt, and olive oil to the yeast mixture. Mix until a dough forms.
- Knead the dough on a floured surface for about 5 minutes until smooth.
- Place the dough in a greased bowl, cover, and let it rise for 1 hour or until doubled in size.
- Preheat the oven to 400°F (200°C).
- Roll out the dough on a floured surface into a rectangle.
- Sprinkle mozzarella and Parmesan cheese evenly over the dough.
- Sprinkle garlic powder and Italian seasoning on top of the cheese.
- Cut the dough into strips and place them on a baking sheet.
- Bake for 15-20 minutes or until golden brown.
- Serve warm and enjoy!
Notes
- For extra flavor, add herbs or spices to the dough.
- These breadsticks can be served with marinara sauce for dipping.
- Store leftovers in an airtight container for up to 2 days.
Nutrition
- Serving Size: 1 breadstick
- Calories: 150
- Sugar: 1g
- Sodium: 200mg
- Fat: 6g
- Saturated Fat: 2g
- Unsaturated Fat: 4g
- Trans Fat: 0g
- Carbohydrates: 20g
- Fiber: 1g
- Protein: 6g
- Cholesterol: 10mg