
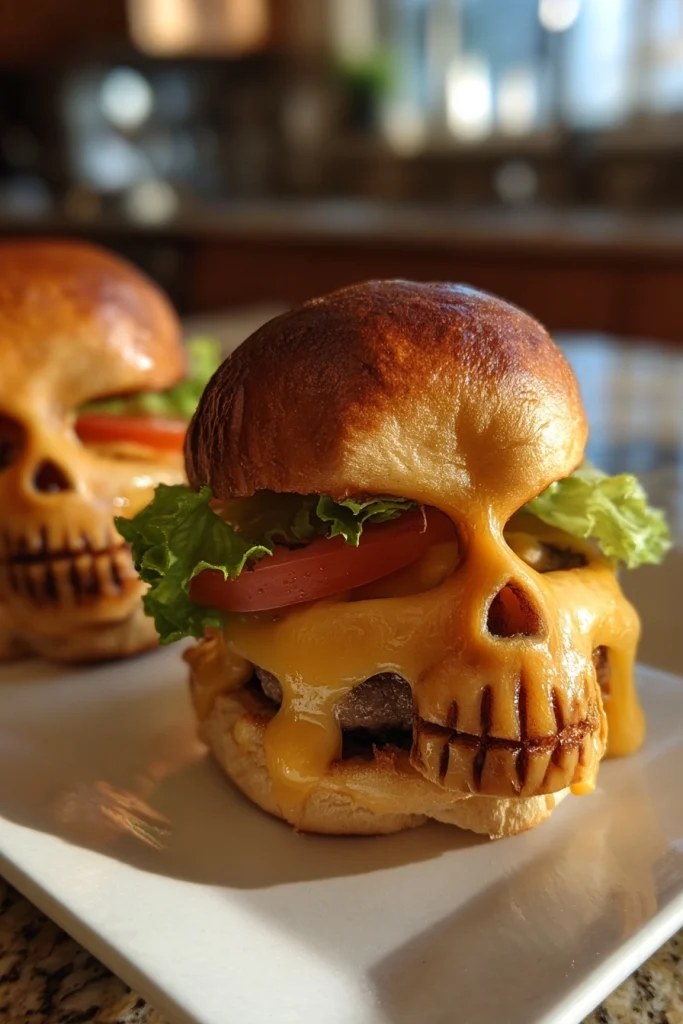
Introduction to Cheeseburger Skull Sliders
As the leaves turn and the air gets crisp, I find myself dreaming of Halloween treats that bring a smile to my family’s faces. That’s where these Cheeseburger Skull Sliders come in! They’re not just delicious; they’re a fun twist on a classic that’s perfect for busy moms like us. Whether you’re hosting a spooky gathering or just want to surprise your kids after school, these sliders are a quick solution that packs a punch of flavor. Plus, who can resist a little Halloween fun on their plate?
Why You’ll Love This Cheeseburger Skull Sliders
These Cheeseburger Skull Sliders are a game-changer for busy weeknights! They come together in just 35 minutes, making them perfect for those hectic evenings when time is tight. The combination of cheesy goodness and spooky fun will delight both kids and adults alike. Plus, they’re easy to customize, so everyone can enjoy their favorite toppings. Trust me, these sliders will become a Halloween tradition in your home!
Ingredients for Cheeseburger Skull Sliders
Gathering the right ingredients is half the fun of cooking! For these Cheeseburger Skull Sliders, you’ll need a few simple staples that pack a flavorful punch. Here’s what you’ll need:
- Ground beef: The star of the show! Choose lean ground beef for a juicy patty that won’t be too greasy.
- Shredded cheddar cheese: This adds a creamy, melty goodness that makes every bite irresistible. Feel free to swap it for your favorite cheese!
- Diced onions: They bring a sweet and savory flavor to the mix. You can use yellow, white, or even red onions for a pop of color.
- Chopped pickles: These add a tangy crunch that balances the richness of the beef. If you’re not a pickle fan, you can skip them or use relish instead.
- Worcestershire sauce: A splash of this sauce enhances the umami flavor of the beef. It’s a secret ingredient that makes a big difference!
- Salt and pepper: Essential for seasoning! Don’t be shy—season to your taste for the best flavor.
- Slider buns: Choose soft, fluffy buns that will cradle your skull-shaped patties perfectly. You can even use whole grain or gluten-free options!
- Ketchup and mustard: Classic condiments that add a zesty kick. You can also offer other toppings like lettuce or tomato for extra crunch.
For those looking for alternatives, you can easily substitute ground beef with plant-based meat for a vegetarian option. And remember, all ingredient quantities are listed at the bottom of the article for easy printing!
How to Make Cheeseburger Skull Sliders
Now that we have our ingredients ready, let’s dive into the fun part—making these Cheeseburger Skull Sliders! Follow these simple steps, and you’ll have a spooky treat that’s sure to impress.
Step 1: Preheat the Oven
First things first, preheat your oven to 350°F (175°C). Preheating is crucial because it ensures even cooking. You want those sliders to bake perfectly, not end up soggy or unevenly cooked. So, let that oven warm up while you prepare the beef mixture!
Step 2: Prepare the Beef Mixture
In a large bowl, combine the ground beef, shredded cheddar cheese, diced onions, chopped pickles, Worcestershire sauce, salt, and pepper. Mix everything together gently but thoroughly. I like to use my hands for this—it’s messy but effective! The key here is to not overwork the meat; you want tender patties, not tough ones. If you want an extra flavor boost, let the mixture sit for a few minutes to meld the flavors.
Step 3: Form Skull-Shaped Patties
Now comes the fun part—shaping the patties! Take a handful of the beef mixture and form it into a skull shape. If you have a skull-shaped cookie cutter, use it for perfect shapes. If not, just mold them by hand. Make sure they’re about the same size so they cook evenly. A little tip: make a small indentation in the center of each patty to help them hold their shape while baking.
Step 4: Bake the Patties
Place your skull-shaped patties on a baking sheet lined with parchment paper. Bake them in the preheated oven for 15-20 minutes. Keep an eye on them! You’ll know they’re done when they’re browned and cooked through. If you have a meat thermometer, aim for an internal temperature of 160°F (70°C) for perfectly cooked beef.
Step 5: Assemble the Sliders
Once the patties are out of the oven, it’s time to assemble your sliders! Place each skull patty inside a slider bun. Add your favorite condiments like ketchup and mustard. For a fun twist, you can even use a squeeze bottle to create spooky designs on the buns. Don’t forget to layer in some lettuce or tomato if you like a little crunch!
Step 6: Serve and Enjoy
Now, it’s time to dig in! Serve your Cheeseburger Skull Sliders immediately while they’re warm. Gather your family around and enjoy these spooky treats together. They’re perfect for Halloween parties or just a fun dinner at home. Don’t forget to snap a few pictures before they disappear!
Tips for Success
- Use lean ground beef for juicy patties without excess grease.
- Don’t overmix the beef mixture; it keeps the patties tender.
- Make the patties uniform in size for even cooking.
- Experiment with different cheeses for unique flavors.
- Let the patties rest for a few minutes after baking for better texture.
- Get creative with toppings to suit everyone’s taste!
Equipment Needed
- Baking sheet: A standard baking sheet works great. You can also use a cast-iron skillet for a crispy finish.
- Parchment paper: This helps prevent sticking. If you don’t have any, lightly grease the baking sheet.
- Mixing bowl: Any large bowl will do for combining ingredients.
- Cookie cutter: A skull-shaped cutter is fun, but your hands work just as well!
Variations
- Vegetarian Option: Substitute ground beef with plant-based meat for a delicious vegetarian slider that everyone can enjoy.
- Cheese Swap: Try different cheeses like pepper jack for a spicy kick or mozzarella for a milder flavor.
- Spicy Sliders: Add diced jalapeños or a dash of hot sauce to the beef mixture for a fiery twist.
- Herb-Infused: Mix in fresh herbs like parsley or cilantro for an aromatic touch that brightens the flavor.
- Gluten-Free: Use gluten-free slider buns to make these sliders suitable for those with gluten sensitivities.
Serving Suggestions
- Side Dishes: Pair your Cheeseburger Skull Sliders with crispy sweet potato fries or a fresh garden salad for a balanced meal.
- Drinks: Serve with spooky-themed drinks like a fizzy punch or classic root beer floats to keep the Halloween spirit alive.
- Presentation: Arrange sliders on a platter with Halloween decorations, like mini pumpkins or spiderwebs, for a festive touch!
FAQs about Cheeseburger Skull Sliders
As you prepare to whip up these delightful Cheeseburger Skull Sliders, you might have a few questions. Here are some common queries that can help you along the way!
Can I make Cheeseburger Skull Sliders ahead of time?
Absolutely! You can prepare the patties in advance and store them in the fridge. Just bake them right before serving for that fresh-out-of-the-oven taste.
What can I use instead of ground beef?
If you’re looking for a vegetarian option, plant-based meat works wonderfully. You can also try ground turkey or chicken for a lighter alternative.
How do I store leftovers?
Store any leftover sliders in an airtight container in the fridge for up to three days. Reheat them in the oven for the best texture!
Can I freeze the patties?
Yes! You can freeze the uncooked patties. Just place them in a single layer on a baking sheet, freeze until solid, then transfer to a freezer bag. They’ll be ready for a quick meal later!
What toppings do you recommend for these sliders?
Get creative! Besides ketchup and mustard, try adding lettuce, tomato, or even avocado for a fresh twist. You can also use fun Halloween-themed toppings to keep the spooky spirit alive!
Final Thoughts
Making Cheeseburger Skull Sliders is more than just cooking; it’s about creating memories with your loved ones. The joy on your kids’ faces as they bite into these spooky treats is priceless. Plus, the ease of preparation means you can spend more time enjoying the festivities rather than stressing in the kitchen. Whether it’s a Halloween party or a cozy family dinner, these sliders bring a delightful twist to your table. So, roll up your sleeves, embrace the fun, and let these sliders become a cherished tradition in your home!
Cheeseburger Skull Sliders You’ll Love for Halloween Fun!
Cheeseburger Skull Sliders are a fun and spooky twist on traditional sliders, perfect for Halloween gatherings.
- Prep Time: 15 minutes
- Cook Time: 20 minutes
- Total Time: 35 minutes
- Yield: 12 sliders 1x
- Category: Appetizer
- Method: Baking
- Cuisine: American
- Diet: Gluten Free
Ingredients
- 1 lb ground beef
- 1/2 cup shredded cheddar cheese
- 1/4 cup diced onions
- 1/4 cup pickles, chopped
- 1 tbsp Worcestershire sauce
- Salt and pepper to taste
- 1 package slider buns
- Ketchup and mustard for serving
Instructions
- Preheat the oven to 350°F (175°C).
- In a large bowl, combine ground beef, cheddar cheese, onions, pickles, Worcestershire sauce, salt, and pepper.
- Form the mixture into small skull-shaped patties.
- Place the patties on a baking sheet and bake for 15-20 minutes or until cooked through.
- Assemble the sliders by placing the patties in slider buns and adding ketchup and mustard.
- Serve immediately and enjoy your spooky treats!
Notes
- For a vegetarian option, substitute ground beef with plant-based meat.
- Feel free to add your favorite toppings like lettuce or tomato.
- These sliders can be made ahead of time and reheated before serving.
Nutrition
- Serving Size: 1 slider
- Calories: 250
- Sugar: 2g
- Sodium: 400mg
- Fat: 15g
- Saturated Fat: 6g
- Unsaturated Fat: 8g
- Trans Fat: 0g
- Carbohydrates: 20g
- Fiber: 1g
- Protein: 12g
- Cholesterol: 50mg