
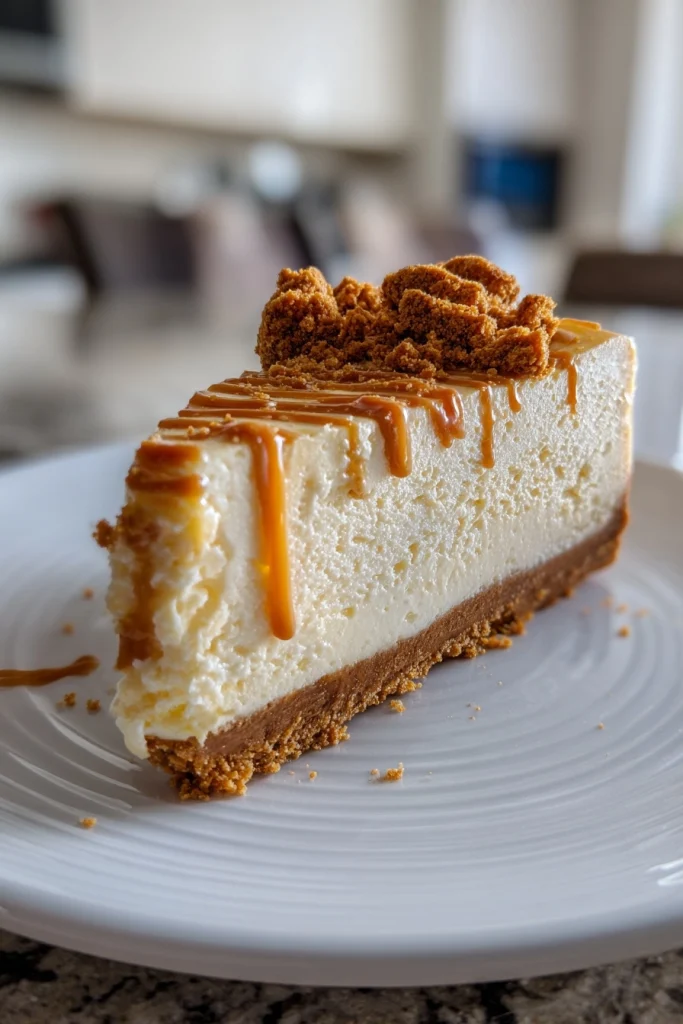
Introduction to Biscoff Cheesecake
As a busy mom, I know how precious time can be, especially when it comes to whipping up something special for my family. That’s why I absolutely adore this Biscoff cheesecake! It’s a creamy delight that combines the irresistible flavors of caramelized cookies with a smooth cream cheese filling. Whether you’re looking to impress guests or simply treat yourself after a long day, this dessert is the perfect solution. With minimal effort and maximum flavor, you’ll find that this Biscoff cheesecake quickly becomes a favorite in your household!
Why You’ll Love This Biscoff Cheesecake
This Biscoff cheesecake is a game-changer for busy lives! It’s incredibly easy to make, requiring just a handful of ingredients and minimal prep time. The rich, creamy texture paired with the sweet, spiced notes of Biscoff cookies creates a dessert that’s simply irresistible. Plus, it’s a crowd-pleaser, making it perfect for family gatherings or a cozy night in. Trust me, once you try it, you’ll be hooked!
Ingredients for Biscoff Cheesecake
Gathering the right ingredients is key to making this delightful Biscoff cheesecake. Here’s what you’ll need:
- Biscoff cookies: These caramelized cookies are the star of the show, providing a sweet and spiced flavor that’s simply divine.
- Unsalted butter: This helps bind the cookie crust together, adding richness without overpowering the flavors.
- Cream cheese: The base of the cheesecake, it gives that creamy texture we all love. Make sure it’s at room temperature for easy mixing!
- Powdered sugar: This sweetens the filling and helps achieve a smooth consistency. You can adjust the amount based on your sweetness preference.
- Heavy cream: Whipping this into the mixture adds a light, airy texture to the cheesecake, making it feel indulgent.
- Vanilla extract: A splash of this adds depth and enhances the overall flavor profile of the cheesecake.
- Biscoff spread: This creamy spread is perfect for drizzling on top. It intensifies the Biscoff flavor and adds a beautiful swirl.
For those looking to customize, consider adding a pinch of salt to balance the sweetness or using gluten-free cookies for a gluten-free version. You can find all the exact measurements at the bottom of the article, ready for printing!
How to Make Biscoff Cheesecake
Now that you have all your ingredients ready, let’s dive into the delightful process of making this Biscoff cheesecake. I promise, it’s easier than you think! Follow these simple steps, and you’ll be on your way to a creamy, dreamy dessert.
Step 1: Preheat the Oven
First things first, preheat your oven to 180°C (350°F). Preheating is crucial because it ensures even baking. If you skip this step, your cheesecake might not set properly, and we don’t want that!
Step 2: Prepare the Crust
Next, grab those Biscoff cookies and crush them into fine crumbs. You can use a food processor or place them in a zip-top bag and smash them with a rolling pin. Once crushed, mix the cookie crumbs with melted butter until it resembles wet sand. This mixture will form the delicious crust of your cheesecake.
Step 3: Form the Crust
Now, take your cookie mixture and press it firmly into the bottom of a springform pan. Use the back of a measuring cup or your fingers to create an even layer. This solid base is essential for holding all that creamy goodness together!
Step 4: Make the Cream Cheese Filling
In a large mixing bowl, beat the cream cheese and powdered sugar together until smooth. I like to use an electric mixer for this, as it makes the process quick and easy. You want a creamy texture with no lumps, so take your time here!
Step 5: Combine Ingredients
Once your cream cheese mixture is smooth, it’s time to add the heavy cream and vanilla extract. Mix until everything is well combined. The heavy cream will add that luscious, airy texture we all crave in a cheesecake.
Step 6: Spread the Filling
Now, gently spread the cream cheese mixture over your crust. Use a spatula to smooth it out evenly. This layer is where the magic happens, so make sure it’s nice and even!
Step 7: Add Biscoff Spread
Drizzle the Biscoff spread on top of the cream cheese filling. Then, take a knife and swirl it through the mixture. This creates beautiful marbled patterns and intensifies that delicious Biscoff flavor.
Step 8: Bake the Cheesecake
Place your cheesecake in the preheated oven and bake for about 30 minutes. You’ll know it’s done when the edges are set but the center still has a slight jiggle. After baking, let it cool at room temperature for a bit before moving on to the next step.
Step 9: Chill and Serve
Finally, refrigerate your cheesecake for at least 4 hours, or overnight if you can wait! Chilling is essential for the cheesecake to set properly. Once it’s chilled, slice it up, and enjoy this creamy Biscoff cheesecake with your loved ones!
Tips for Success
- Make sure your cream cheese is at room temperature for easy mixing.
- Don’t rush the chilling process; it’s key for a perfect texture.
- For a smoother filling, sift the powdered sugar before adding it.
- Use a sharp knife to slice the cheesecake for clean edges.
- Feel free to experiment with toppings like whipped cream or chocolate drizzle!
Equipment Needed
- Springform pan: Essential for easy removal. A regular cake pan works too, but slicing will be trickier.
- Mixing bowls: Use a large bowl for the filling and a smaller one for the crust.
- Electric mixer: Makes beating the cream cheese a breeze. A whisk works if you’re feeling strong!
- Spatula: Perfect for spreading the filling evenly.
- Measuring cups and spoons: Accurate measurements ensure the best results.
Variations of Biscoff Cheesecake
- Chocolate Biscoff Cheesecake: Add melted chocolate to the cream cheese mixture for a rich, chocolatey twist.
- Nutty Biscoff Cheesecake: Incorporate crushed nuts like pecans or walnuts into the crust for added texture and flavor.
- Fruit Topped Biscoff Cheesecake: Top with fresh berries or sliced bananas for a fruity contrast to the creamy filling.
- Vegan Biscoff Cheesecake: Substitute cream cheese with a vegan alternative and use coconut cream for a dairy-free version.
- Gluten-Free Biscoff Cheesecake: Use gluten-free Biscoff cookies to make the crust suitable for gluten-sensitive diets.
Serving Suggestions for Biscoff Cheesecake
- Pair with a dollop of whipped cream for an extra touch of indulgence.
- Serve alongside a scoop of vanilla ice cream to complement the flavors.
- Drizzle with chocolate or caramel sauce for a beautiful presentation.
- Garnish with crushed Biscoff cookies for added texture and flair.
- Enjoy with a cup of coffee or tea for a delightful afternoon treat.
FAQs about Biscoff Cheesecake
As you embark on your Biscoff cheesecake journey, you might have a few questions. Here are some common queries I’ve encountered, along with helpful answers to guide you along the way!
Can I make Biscoff cheesecake ahead of time?
Absolutely! In fact, making it a day in advance allows the flavors to meld beautifully. Just be sure to keep it covered in the fridge until you’re ready to serve.
What can I use instead of Biscoff cookies?
If you can’t find Biscoff cookies, graham crackers or digestive biscuits work well as substitutes. They’ll give you a different flavor, but still create a delicious crust!
How do I store leftover Biscoff cheesecake?
Store any leftovers in an airtight container in the fridge. It should last for about 3-4 days, but trust me, it’s so good, you might not have any left!
Can I freeze Biscoff cheesecake?
Yes, you can freeze it! Just wrap it tightly in plastic wrap and then foil. When you’re ready to enjoy it, let it thaw in the fridge overnight.
What toppings pair well with Biscoff cheesecake?
Consider topping it with whipped cream, chocolate drizzle, or even fresh fruit. Crushed Biscoff cookies on top add a delightful crunch and enhance the flavor!
Final Thoughts
Making this Biscoff cheesecake is more than just baking; it’s about creating sweet memories with your loved ones. The creamy texture and delightful flavors will have everyone coming back for seconds. I love how this dessert can turn an ordinary day into something special, whether it’s a family gathering or a quiet evening at home. Plus, the smiles on my family’s faces when they take that first bite? Priceless! So, roll up your sleeves, gather your ingredients, and let this Biscoff cheesecake bring joy to your kitchen and your heart!
PrintBiscoff Cheesecake: Indulge in This Creamy Delight!
A rich and creamy Biscoff cheesecake that combines the flavors of caramelized cookies with a smooth cream cheese filling, perfect for dessert lovers.
- Prep Time: 20 minutes
- Cook Time: 30 minutes
- Total Time: 4 hours 50 minutes
- Yield: 8 servings 1x
- Category: Dessert
- Method: Baking
- Cuisine: American
- Diet: Vegetarian
Ingredients
- 200g Biscoff cookies
- 100g unsalted butter, melted
- 400g cream cheese
- 100g powdered sugar
- 200ml heavy cream
- 1 tsp vanilla extract
- 50g Biscoff spread
Instructions
- Preheat the oven to 180°C (350°F).
- Crush the Biscoff cookies into fine crumbs and mix with melted butter.
- Press the cookie mixture into the bottom of a springform pan to form the crust.
- In a bowl, beat the cream cheese and powdered sugar until smooth.
- Add the heavy cream and vanilla extract, and mix until well combined.
- Spread the cream cheese mixture over the crust.
- Drizzle the Biscoff spread on top and swirl it with a knife.
- Bake for 30 minutes, then let it cool before refrigerating for at least 4 hours.
- Serve chilled and enjoy!
Notes
- For a stronger Biscoff flavor, add more Biscoff spread.
- Can be topped with whipped cream and crushed Biscoff cookies for garnish.
- Make sure to let the cheesecake cool completely before refrigerating.
Nutrition
- Serving Size: 1 slice
- Calories: 350
- Sugar: 20g
- Sodium: 200mg
- Fat: 25g
- Saturated Fat: 15g
- Unsaturated Fat: 5g
- Trans Fat: 0g
- Carbohydrates: 30g
- Fiber: 1g
- Protein: 4g
- Cholesterol: 70mg