
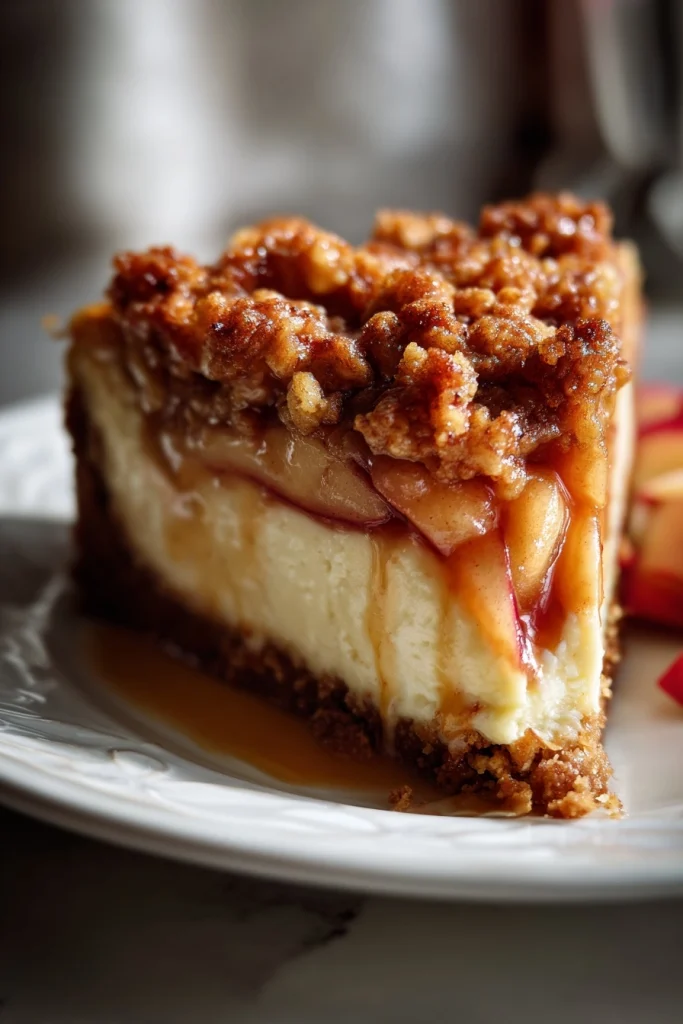
Introduction to Apple Crisp Cheesecake
As a busy mom, I know how precious time can be, especially when it comes to whipping up something special for my family. That’s why I absolutely adore this apple crisp cheesecake! It’s the perfect blend of creamy cheesecake and crunchy apple crisp, making it a delightful treat that everyone will love. Whether you’re looking to impress guests or simply want to indulge in a sweet moment after a long day, this recipe is a quick solution that brings joy to any table. Trust me, once you try it, you’ll be hooked!
Why You’ll Love This Apple Crisp Cheesecake
This apple crisp cheesecake is a game-changer for busy lives. It combines the rich, creamy texture of cheesecake with the warm, comforting flavors of apple crisp. Plus, it’s surprisingly easy to make! In just over an hour, you can create a dessert that feels indulgent yet is simple enough for any weeknight. Your family will rave about it, and you’ll love how quickly it comes together!
Ingredients for Apple Crisp Cheesecake
Gathering the right ingredients is the first step to creating this delicious apple crisp cheesecake. Here’s what you’ll need:
- Cream Cheese: The star of the show! It gives the cheesecake its rich and creamy texture.
- Sugar: Sweetens the cheesecake, balancing the tartness of the apples.
- Vanilla Extract: Adds a warm, aromatic flavor that enhances the overall taste.
- Eggs: These help bind the cheesecake together, giving it structure and richness.
- Sliced Apples: Fresh apples bring a juicy, fruity element. I love using Granny Smith for their tartness!
- Cinnamon: This spice adds warmth and a hint of nostalgia, making every bite feel like a cozy hug.
- Rolled Oats: Essential for the crisp topping, they provide a delightful crunch.
- Brown Sugar: Adds a deeper sweetness and a hint of caramel flavor to the crisp topping.
- Flour: Helps bind the crisp topping together, creating that perfect crumble.
- Butter: Melted butter adds richness and helps the crisp topping achieve that golden-brown color.
For those looking to switch things up, consider using different apple varieties or adding nuts to the crisp topping for extra texture. You can find all the exact measurements at the bottom of the article, ready for printing!
How to Make Apple Crisp Cheesecake
Now that you have all your ingredients ready, let’s dive into the fun part—making this apple crisp cheesecake! Follow these simple steps, and you’ll have a dessert that’s sure to impress.
Step 1: Preheat the Oven
First things first, preheat your oven to 325°F (160°C). Preheating is crucial because it ensures even baking. If you skip this step, your cheesecake might not set properly, and we definitely want that creamy texture!
Step 2: Prepare the Cheesecake Mixture
In a mixing bowl, beat together the cream cheese, sugar, and vanilla extract until smooth. I like to use an electric mixer for this part. It makes the process quick and easy! You want a creamy consistency without any lumps, so take your time here.
Step 3: Add the Eggs
Next, add the eggs one at a time, mixing well after each addition. This step is important because it helps incorporate air into the mixture, making your cheesecake light and fluffy. Don’t rush it; let each egg blend in before adding the next!
Step 4: Prepare the Apples
Now, let’s focus on those apples! In a separate bowl, combine the sliced apples with cinnamon. Toss them gently to coat. This step adds a lovely warmth to the apples, enhancing their flavor. Set them aside while you prepare the crisp topping.
Step 5: Make the Crisp Topping
In another bowl, mix the rolled oats, brown sugar, flour, and melted butter. Use your hands or a fork to combine everything until it resembles a crumbly mixture. This topping is what gives the cheesecake that delightful crunch, so make sure it’s well mixed!
Step 6: Assemble the Cheesecake
Now it’s time to bring it all together! Pour the cheesecake mixture into a greased springform pan. Spread it evenly, then layer the cinnamon apples on top. Finally, sprinkle the oat crisp topping over the apples. It’s like building a delicious dessert lasagna!
Step 7: Bake the Cheesecake
Place your assembled cheesecake in the preheated oven and bake for 50-60 minutes. Keep an eye on it! The center should be set but still slightly jiggly. If the edges start to brown too much, you can cover them with foil.
Step 8: Cool and Serve
Once baked, let the cheesecake cool in the pan for about 10 minutes. Then, carefully remove the sides of the springform pan. Allow it to cool completely before serving. This step is key! Cooling helps the flavors meld together beautifully, making each bite even more delicious.
Tips for Success
- Use room temperature cream cheese for a smoother batter.
- Don’t skip the cooling step; it enhances the flavors.
- For a fun twist, add chopped nuts to the crisp topping.
- Keep an eye on the baking time; every oven is different.
- Serve with a dollop of whipped cream for extra indulgence!
Equipment Needed
- Mixing Bowls: Use any size you have; just make sure they’re sturdy.
- Electric Mixer: A hand mixer works great, but a stand mixer is even better!
- Springform Pan: Essential for easy removal; a regular cake pan can work too.
- Measuring Cups and Spoons: Accurate measurements are key for baking success.
- Spatula: Perfect for spreading the cheesecake mixture evenly.
Variations of Apple Crisp Cheesecake
- Nutty Delight: Add chopped walnuts or pecans to the crisp topping for an extra crunch and flavor.
- Caramel Swirl: Drizzle caramel sauce into the cheesecake mixture before baking for a sweet surprise.
- Spiced Up: Experiment with spices like nutmeg or ginger for a warm, autumnal twist.
- Gluten-Free Option: Substitute regular flour with almond flour or a gluten-free blend for a gluten-free version.
- Fruit Fusion: Mix in other fruits like pears or cranberries with the apples for a delightful medley.
Serving Suggestions for Apple Crisp Cheesecake
- Whipped Cream: A dollop of freshly whipped cream adds a light, airy touch.
- Caramel Sauce: Drizzle warm caramel sauce over each slice for extra sweetness.
- Ice Cream: Serve with a scoop of vanilla ice cream for a classic pairing.
- Fresh Fruit: Garnish with slices of fresh apples or berries for a pop of color.
- Herbal Tea: Pair with a warm cup of chamomile or chai for a cozy dessert experience.
FAQs about Apple Crisp Cheesecake
Can I make apple crisp cheesecake ahead of time?
Absolutely! This cheesecake can be made a day in advance. Just store it in the refrigerator after it cools completely. It actually tastes even better the next day as the flavors meld together!
What type of apples are best for this recipe?
I recommend using Granny Smith apples for their tartness, which balances the sweetness of the cheesecake. However, you can also mix in Honeycrisp or Fuji apples for a sweeter flavor.
Can I freeze apple crisp cheesecake?
Yes, you can freeze it! Just wrap it tightly in plastic wrap and then in aluminum foil. It can be frozen for up to three months. Thaw it in the refrigerator overnight before serving.
How do I know when the cheesecake is done baking?
The cheesecake is done when the edges are set, but the center still has a slight jiggle. It will firm up as it cools, so don’t worry if it looks a bit wobbly when you take it out!
What can I serve with apple crisp cheesecake?
This cheesecake pairs wonderfully with whipped cream, caramel sauce, or even a scoop of vanilla ice cream. Fresh fruit or a warm cup of tea also make delightful accompaniments!
Final Thoughts
Making this apple crisp cheesecake is more than just baking; it’s about creating memories. The delightful combination of creamy cheesecake and crunchy apple crisp brings smiles to my family’s faces, and I know it will do the same for yours. Whether it’s a special occasion or a simple weeknight treat, this dessert is sure to impress. Plus, the aroma wafting through your kitchen will have everyone eagerly waiting for a slice. So, roll up your sleeves, gather your loved ones, and enjoy the sweet moments that come with sharing this delicious creation!
PrintApple Crisp Cheesecake: A Creamy, Irresistible Delight!
A delicious blend of creamy cheesecake and crunchy apple crisp, perfect for dessert lovers.
- Prep Time: 20 minutes
- Cook Time: 60 minutes
- Total Time: 1 hour 20 minutes
- Yield: 12 servings 1x
- Category: Dessert
- Method: Baking
- Cuisine: American
- Diet: Vegetarian
Ingredients
- 2 cups cream cheese
- 1 cup sugar
- 1 teaspoon vanilla extract
- 3 large eggs
- 2 cups sliced apples
- 1 teaspoon cinnamon
- 1 cup rolled oats
- 1/2 cup brown sugar
- 1/2 cup flour
- 1/2 cup butter, melted
Instructions
- Preheat the oven to 325°F (160°C).
- In a mixing bowl, beat the cream cheese, sugar, and vanilla until smooth.
- Add the eggs one at a time, mixing well after each addition.
- In another bowl, combine sliced apples with cinnamon and set aside.
- In a separate bowl, mix oats, brown sugar, flour, and melted butter to create the crisp topping.
- Pour the cheesecake mixture into a greased springform pan.
- Layer the cinnamon apples on top of the cheesecake mixture.
- Sprinkle the oat crisp topping over the apples.
- Bake for 50-60 minutes or until the center is set.
- Let it cool before serving.
Notes
- For a richer flavor, use full-fat cream cheese.
- Serve with whipped cream or caramel sauce for extra indulgence.
- Store leftovers in the refrigerator for up to 3 days.
Nutrition
- Serving Size: 1 slice
- Calories: 350
- Sugar: 25g
- Sodium: 200mg
- Fat: 18g
- Saturated Fat: 10g
- Unsaturated Fat: 6g
- Trans Fat: 0g
- Carbohydrates: 40g
- Fiber: 2g
- Protein: 5g
- Cholesterol: 80mg