
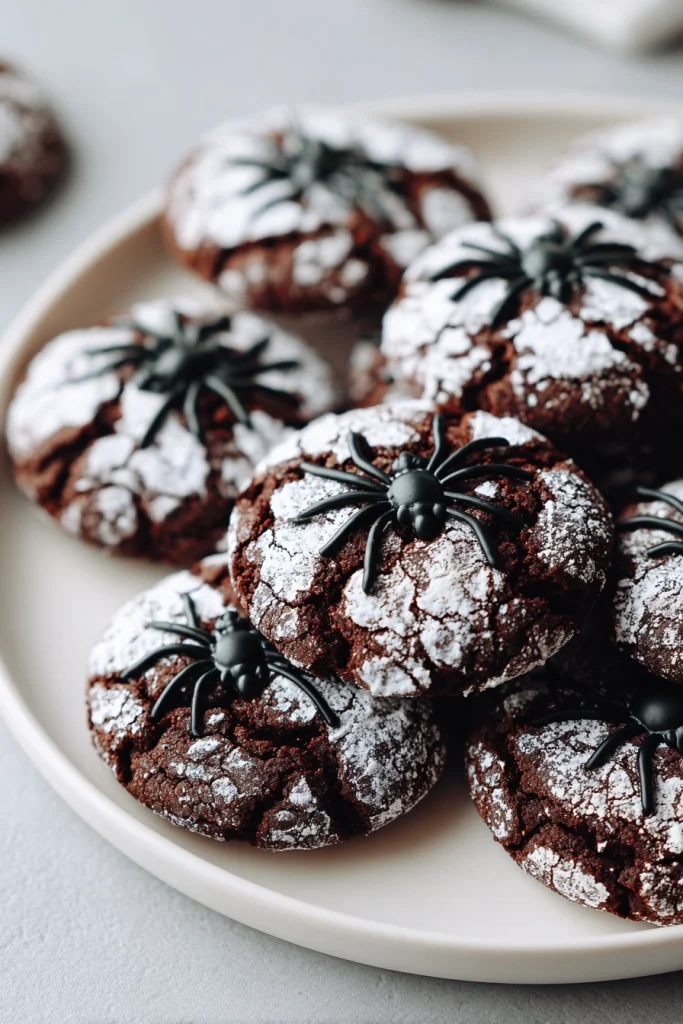
Introduction to Spider Chocolate Crinkle Cookies
As the leaves turn and the air gets crisp, I find myself craving cozy treats that bring a little magic to my kitchen. That’s where these Spider Chocolate Crinkle Cookies come in! They’re not just any cookies; they’re a delightful blend of rich chocolate and a fun, spooky twist perfect for Halloween. If you’re a busy mom or professional like me, this recipe is a quick solution for those hectic days when you want to impress your loved ones without spending hours in the kitchen. Trust me, these cookies will be a hit!
Why You’ll Love This Spider Chocolate Crinkle Cookies
These Spider Chocolate Crinkle Cookies are a dream come true for busy cooks! They come together in no time, making them perfect for last-minute gatherings or school events. The rich chocolate flavor is irresistible, and the crinkly texture adds a delightful crunch. Plus, decorating them with cute spider candies is a fun activity for the kids. You’ll love how these cookies bring smiles without the stress!
Ingredients for Spider Chocolate Crinkle Cookies
Gathering the right ingredients is the first step to creating these delightful Spider Chocolate Crinkle Cookies. Here’s what you’ll need:
- All-purpose flour: This is the base of your cookies, providing structure and a soft texture.
- Unsweetened cocoa powder: For that rich chocolate flavor, cocoa powder is essential. It gives the cookies their deep color and taste.
- Granulated sugar: This sweetener helps create a chewy texture and balances the cocoa’s bitterness.
- Brown sugar: Adds moisture and a hint of caramel flavor, making the cookies extra delicious.
- Vegetable oil: This keeps the cookies moist and tender, ensuring they don’t dry out.
- Large eggs: Eggs act as a binding agent, helping the cookies hold their shape while adding richness.
- Vanilla extract: A splash of vanilla enhances the overall flavor, making the cookies taste even better.
- Baking powder: This leavening agent helps the cookies rise and achieve that lovely crinkle effect.
- Salt: Just a pinch enhances the sweetness and balances the flavors.
- Powdered sugar: For dusting, it gives the cookies a snowy appearance and adds a touch of sweetness.
- Chocolate candies: These are for decorating your cookies, transforming them into spooky spiders. Feel free to get creative with your choices!
For exact measurements, check the bottom of the article where you can find everything listed for easy printing. Happy baking!
How to Make Spider Chocolate Crinkle Cookies
Now that you have your ingredients ready, let’s dive into the fun part—making these Spider Chocolate Crinkle Cookies! Follow these simple steps, and you’ll have a batch of spooky delights in no time.
Step 1: Preheat the Oven
First things first, preheat your oven to 350°F (175°C). Preheating is crucial because it ensures your cookies bake evenly. If the oven isn’t hot enough, your cookies might spread too much, losing that lovely crinkle effect. So, let that oven warm up while you prepare the dough!
Step 2: Mix Dry Ingredients
In a medium bowl, combine the all-purpose flour, unsweetened cocoa powder, baking powder, and salt. Whisk them together until they’re well blended. This step is important because it helps distribute the leavening agent evenly, ensuring your cookies rise beautifully. Plus, it’s a great way to get that chocolatey aroma wafting through your kitchen!
Step 3: Combine Wet Ingredients
In a separate large bowl, whisk together the granulated sugar, brown sugar, and vegetable oil until smooth. Then, add the eggs and vanilla extract, mixing until everything is well combined. This mixture should be glossy and slightly thick. The sugars will add sweetness, while the oil keeps your cookies moist and tender.
Step 4: Combine Wet and Dry Mixtures
Now, it’s time to bring the two mixtures together! Gradually add the dry ingredients to the wet ingredients. Stir gently until just combined. Be careful not to overmix; you want to keep that tender texture. A few flour streaks are okay—this will help maintain the cookies’ delightful crinkle.
Step 5: Chill the Dough
Once your dough is mixed, cover the bowl with plastic wrap and chill it in the refrigerator for about 30 minutes. Chilling is key! It helps the cookies hold their shape while baking, preventing them from spreading too much. Plus, it makes the dough easier to handle when shaping.
Step 6: Shape the Cookies
After chilling, scoop tablespoon-sized portions of dough and roll them into balls. I like to use a cookie scoop for this—it makes the process quick and easy! Once rolled, coat each ball in powdered sugar until fully covered. This not only adds sweetness but also creates that signature crinkle effect as they bake.
Step 7: Bake the Cookies
Place the powdered sugar-coated balls on a baking sheet lined with parchment paper, spacing them about 2 inches apart. This gives them room to spread without merging into one giant cookie! Bake for 10-12 minutes, or until the edges are set and the tops are crinkled. Your kitchen will smell heavenly during this time!
Step 8: Cool and Decorate
Once baked, let the cookies cool on the baking sheet for a few minutes before transferring them to a wire rack. This helps them firm up a bit. After they’ve cooled completely, it’s time for the fun part—decorating! Use chocolate candies to create spider shapes on top of each cookie. Get creative and have fun with it!
Tips for Success
- Always preheat your oven for even baking.
- Chill the dough to prevent spreading and enhance texture.
- Use a cookie scoop for uniform cookie sizes.
- Don’t overmix the dough; a few flour streaks are fine.
- Experiment with different candies for unique spider designs.
Equipment Needed
- Mixing bowls: A set of various sizes is handy; you can use any large bowl if needed.
- Whisk: A whisk is great for mixing; a fork works in a pinch.
- Cookie scoop: This helps with uniform sizes; a tablespoon can also do the trick.
- Baking sheet: Use any flat baking tray; line it with parchment paper for easy cleanup.
- Wire rack: Essential for cooling; a plate can work if you don’t have one.
Variations
- Gluten-free: Substitute all-purpose flour with a gluten-free flour blend for a delicious gluten-free version.
- Vegan: Replace eggs with flaxseed meal (1 tablespoon flaxseed meal + 2.5 tablespoons water per egg) and use a plant-based oil.
- Minty twist: Add a few drops of peppermint extract to the wet ingredients for a refreshing mint flavor.
- Nutty addition: Fold in some chopped nuts, like walnuts or pecans, for added crunch and flavor.
- Spicy kick: Mix in a pinch of cayenne pepper or cinnamon for a warm, spicy undertone.
Serving Suggestions
- Pair these Spider Chocolate Crinkle Cookies with a glass of cold milk for a classic treat.
- Serve them alongside a warm cup of hot cocoa for a cozy dessert experience.
- For a festive touch, arrange the cookies on a spooky-themed platter.
- Consider adding a scoop of vanilla ice cream on the side for an indulgent treat.
FAQs about Spider Chocolate Crinkle Cookies
As you embark on your baking adventure with these Spider Chocolate Crinkle Cookies, you might have a few questions. Here are some common queries that can help you along the way!
Can I make the dough ahead of time?
Absolutely! You can prepare the dough in advance and store it in the refrigerator for up to 2 days. Just remember to chill it before shaping and baking for the best results.
What can I use instead of chocolate candies for decoration?
If you want to switch things up, consider using gummy spiders, candy eyes, or even chocolate chips. The goal is to have fun and get creative with your spooky designs!
How do I store the cookies after baking?
Store your Spider Chocolate Crinkle Cookies in an airtight container at room temperature. They’ll stay fresh for about a week, but I doubt they’ll last that long!
Can I freeze these cookies?
Yes, you can freeze the baked cookies! Just place them in a freezer-safe container or bag. They’ll keep well for up to 3 months. Thaw them at room temperature before enjoying.
What if my cookies don’t crinkle?
If your cookies don’t develop that lovely crinkle, it might be due to not chilling the dough long enough or overmixing. Don’t worry; they’ll still taste delicious!
Final Thoughts
Making Spider Chocolate Crinkle Cookies is more than just baking; it’s about creating joyful moments in the kitchen. The rich chocolate flavor and delightful crinkle texture make these cookies a treat for both the eyes and the taste buds. Plus, decorating them with little spider candies adds a fun twist that kids and adults alike will love. Whether you’re sharing them at a Halloween party or enjoying them with your family, these cookies are sure to bring smiles and warmth to your home. So, roll up your sleeves and let the baking magic begin!
PrintSpider Chocolate Crinkle Cookies: A Spooky Delight!

Spider Chocolate Crinkle Cookies are a fun and spooky treat perfect for Halloween. These cookies are rich, chocolatey, and have a delightful crinkle texture, topped with spider decorations for a festive touch.
- Prep Time: 20 minutes
- Cook Time: 12 minutes
- Total Time: 1 hour
- Yield: 24 cookies 1x
- Category: Dessert
- Method: Baking
- Cuisine: American
- Diet: Vegetarian
Ingredients
- 1 cup all-purpose flour
- 1/2 cup unsweetened cocoa powder
- 1 cup granulated sugar
- 1/2 cup brown sugar
- 1/2 cup vegetable oil
- 2 large eggs
- 1 teaspoon vanilla extract
- 1 teaspoon baking powder
- 1/2 teaspoon salt
- Powdered sugar for dusting
- Chocolate candies for spider decoration
Instructions
- Preheat your oven to 350°F (175°C).
- In a bowl, mix together the flour, cocoa powder, baking powder, and salt.
- In another bowl, whisk together the granulated sugar, brown sugar, and vegetable oil until well combined.
- Add the eggs and vanilla extract to the sugar mixture and mix until smooth.
- Gradually add the dry ingredients to the wet ingredients, mixing until just combined.
- Chill the dough in the refrigerator for about 30 minutes.
- Once chilled, scoop tablespoon-sized portions of dough and roll them into balls.
- Roll the balls in powdered sugar until fully coated.
- Place the cookies on a baking sheet lined with parchment paper, spacing them about 2 inches apart.
- Bake for 10-12 minutes, or until the edges are set and the tops are crinkled.
- Let the cookies cool on the baking sheet for a few minutes before transferring them to a wire rack.
- Once cooled, decorate with chocolate candies to create spider shapes.
Notes
- For a more intense chocolate flavor, use dark cocoa powder.
- Make sure to chill the dough to prevent the cookies from spreading too much while baking.
- Feel free to use different candies for decoration to suit your taste.
Nutrition
- Serving Size: 1 cookie
- Calories: 150
- Sugar: 10g
- Sodium: 50mg
- Fat: 7g
- Saturated Fat: 1g
- Unsaturated Fat: 6g
- Trans Fat: 0g
- Carbohydrates: 20g
- Fiber: 1g
- Protein: 2g
- Cholesterol: 20mg