
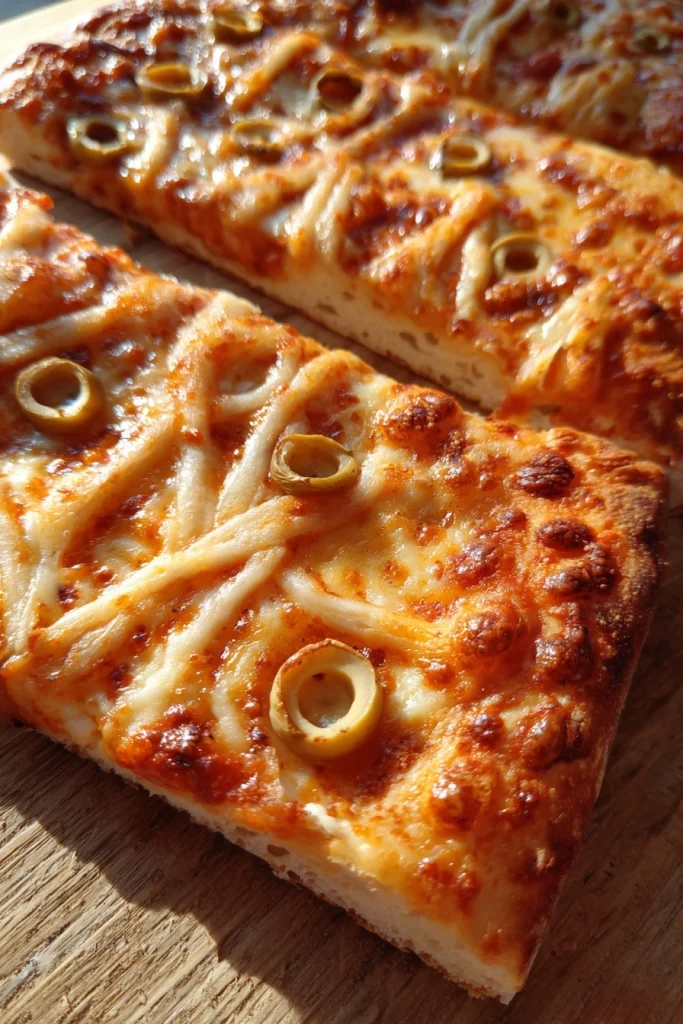
Introduction to Mummy Pizzas
As the leaves turn and the air gets crisp, it’s time to embrace the fun of Halloween! One of my favorite ways to celebrate is with Mummy Pizzas. These delightful little creations are not just a treat for the taste buds; they’re a feast for the eyes too! Perfect for busy moms like us, they come together quickly and are sure to impress your loved ones. Whether you’re hosting a spooky gathering or just looking for a fun family dinner, Mummy Pizzas are the answer. Let’s dive into this deliciously festive recipe!
Why You’ll Love This Mummy Pizzas
Mummy Pizzas are the perfect blend of fun and flavor! They’re incredibly easy to whip up, making them a lifesaver on busy weeknights. Plus, the kids will love helping out, turning dinner into a delightful family activity. With gooey cheese and savory toppings, these spooky snacks are sure to please even the pickiest eaters. Trust me, once you try them, they’ll become a Halloween tradition in your home!
Ingredients for Mummy Pizzas
Gathering the right ingredients is half the fun of making Mummy Pizzas! Here’s what you’ll need:
- Pizza Dough: The base of our Mummy Pizzas. You can use store-bought for convenience or make your own if you’re feeling adventurous.
- Pizza Sauce: This adds a burst of flavor. Feel free to use your favorite brand or homemade sauce for a personal touch.
- Shredded Mozzarella Cheese: The gooey goodness that holds everything together. It melts beautifully and gives that classic pizza taste.
- Sliced Black Olives: These are perfect for creating spooky eyes. If olives aren’t your thing, you can use pepperoni or even small pieces of bell pepper.
- Pepperoni Slices: A classic topping that adds a savory kick. You can swap it out for veggies or turkey pepperoni for a healthier option.
- Egg (for egg wash): This gives the dough a lovely golden finish. If you prefer a vegan option, a little olive oil can work too!
Feel free to customize your Mummy Pizzas with any toppings you love! The exact quantities for each ingredient are listed at the bottom of the article for easy printing. Happy cooking!
How to Make Mummy Pizzas
Making Mummy Pizzas is a delightful adventure! Follow these simple steps to create your spooky snacks. Each step is designed to be easy and fun, so let’s get started!
Step 1: Preheat the Oven
First things first, preheat your oven to 400°F (200°C). Preheating is crucial because it ensures that your Mummy Pizzas bake evenly. A hot oven helps the dough rise and gives it that perfect golden-brown finish. Trust me, you don’t want to skip this step!
Step 2: Prepare the Dough
Next, roll out your pizza dough on a floured surface. Aim for about a quarter-inch thickness. Then, cut the dough into rectangles. These will be the bodies of your mummies. Don’t worry about making them perfect; a little irregularity adds to the charm!
Step 3: Add the Sauce
Now it’s time to spread the pizza sauce! Take a spoon and dollop a generous amount of sauce on each rectangle. Use the back of the spoon to spread it evenly, leaving a small border around the edges. This will keep the sauce from spilling over while baking.
Step 4: Layer the Cheese
Next, sprinkle shredded mozzarella cheese over the sauce. Make sure to cover the sauce completely. The cheese is what makes these Mummy Pizzas ooey-gooey and delicious! You can be generous here; who doesn’t love extra cheese?
Step 5: Create Mummy Bandages
Now comes the fun part! Take strips of dough from the remaining pizza dough and lay them over the cheese to create mummy bandages. Crisscross them for a spooky effect. Don’t worry about being too neat; the more haphazard, the better it looks!
Step 6: Add the Eyes
For the finishing touch, place two black olive slices on each mummy pizza for eyes. You can also use pepperoni or even small pieces of bell pepper if you prefer. This little detail brings your mummies to life!
Step 7: Brush with Egg Wash
To achieve that beautiful golden finish, brush the exposed dough with an egg wash. Simply beat an egg and use a pastry brush to apply it. If you’re looking for a vegan option, a light drizzle of olive oil works just as well!
Step 8: Bake the Pizzas
Now, it’s time to bake! Place your Mummy Pizzas in the preheated oven and bake for 15-20 minutes. Keep an eye on them; they’re done when the dough is golden brown and the cheese is bubbly. Your kitchen will smell amazing!
Step 9: Cool and Serve
Once baked, let the Mummy Pizzas cool for a few minutes. This helps the cheese set a bit, making them easier to handle. Serve them warm and watch your family’s faces light up with delight!
Tips for Success
- Use pre-made pizza dough for a quicker prep time.
- Experiment with different toppings to suit your family’s taste.
- Make a double batch and freeze some for a last-minute treat.
- Let the kids help with the assembly; it’s a fun activity!
- Keep an eye on the baking time to avoid overcooking.
Equipment Needed
- Baking Sheet: A standard baking sheet works perfectly. If you don’t have one, a large oven-safe dish will do.
- Parchment Paper: This helps prevent sticking. If you’re out, just grease the baking sheet lightly.
- Rolling Pin: Essential for rolling out dough. A wine bottle can be a fun alternative!
- Pastry Brush: Great for applying egg wash. A clean paintbrush can work in a pinch.
Variations
- Veggie Mummy Pizzas: Swap out pepperoni for a mix of colorful veggies like bell peppers, mushrooms, and spinach for a healthier twist.
- Gluten-Free Option: Use gluten-free pizza dough to accommodate dietary restrictions while still enjoying the fun!
- Cheesy Mummy Pizzas: Add a layer of ricotta or cream cheese under the mozzarella for an extra creamy texture.
- Spicy Mummy Pizzas: Incorporate jalapeños or spicy sausage for those who enjoy a little heat in their Halloween treats.
- Sweet Mummy Pizzas: For a dessert twist, use sweet dough and top with Nutella and banana slices, then create mummy bandages with strips of dough.
Serving Suggestions
- Side Salad: Pair your Mummy Pizzas with a fresh green salad for a balanced meal.
- Spooky Drinks: Serve with themed drinks like “witches’ brew” punch or orange soda for a festive touch.
- Presentation: Arrange the Mummy Pizzas on a Halloween-themed platter for a fun display.
FAQs about Mummy Pizzas
Can I make Mummy Pizzas ahead of time?
Absolutely! You can prepare the Mummy Pizzas in advance and store them in the fridge. Just bake them right before serving for that fresh-out-of-the-oven taste!
What toppings can I use for Mummy Pizzas?
The beauty of Mummy Pizzas is their versatility! You can use any toppings you love. Try veggies, different cheeses, or even barbecue chicken for a fun twist!
How do I store leftover Mummy Pizzas?
Store any leftovers in an airtight container in the fridge. They’ll stay fresh for about 2-3 days. Just reheat them in the oven for a few minutes before enjoying!
Can I freeze Mummy Pizzas?
Yes! Mummy Pizzas freeze well. Just wrap them tightly in plastic wrap and place them in a freezer-safe bag. They can last up to a month in the freezer.
Are Mummy Pizzas suitable for kids?
Definitely! Mummy Pizzas are a hit with kids. They can help with the assembly, making it a fun family activity. Plus, they’re delicious and easy to eat!
Final Thoughts
Creating Mummy Pizzas is more than just cooking; it’s about making memories with your loved ones. The joy of seeing your family’s faces light up as they dig into these spooky treats is priceless. Plus, the laughter and fun that come from assembling these little mummies together make for a delightful evening. Whether you’re celebrating Halloween or just looking for a fun dinner idea, Mummy Pizzas are sure to bring smiles to your table. So roll up your sleeves, gather your ingredients, and let the Halloween festivities begin!
PrintMummy Pizzas: Unleash Fun for Your Halloween Feast!
Mummy Pizzas are a fun and festive dish perfect for Halloween celebrations, featuring a spooky mummy design made with pizza dough and toppings.
- Prep Time: 15 minutes
- Cook Time: 20 minutes
- Total Time: 35 minutes
- Yield: 8 servings 1x
- Category: Appetizer
- Method: Baking
- Cuisine: Italian
- Diet: Vegetarian
Ingredients
- 1 package of pizza dough
- 1 cup pizza sauce
- 1 1/2 cups shredded mozzarella cheese
- 1/2 cup sliced black olives
- 1/2 cup pepperoni slices
- 1 egg (for egg wash)
Instructions
- Preheat the oven to 400°F (200°C).
- Roll out the pizza dough and cut it into rectangles.
- Spread pizza sauce on each rectangle.
- Layer shredded mozzarella cheese on top of the sauce.
- Use strips of dough to create mummy bandages over the cheese.
- Place two black olive slices for eyes on each mummy pizza.
- Brush the dough with egg wash for a golden finish.
- Bake in the preheated oven for 15-20 minutes or until golden brown.
- Let cool slightly before serving.
Notes
- Feel free to customize toppings based on your preferences.
- Use pre-made dough for a quicker preparation.
- These can be made ahead of time and reheated before serving.
Nutrition
- Serving Size: 1 pizza
- Calories: 250
- Sugar: 2g
- Sodium: 500mg
- Fat: 10g
- Saturated Fat: 4g
- Unsaturated Fat: 3g
- Trans Fat: 0g
- Carbohydrates: 30g
- Fiber: 1g
- Protein: 10g
- Cholesterol: 30mg