
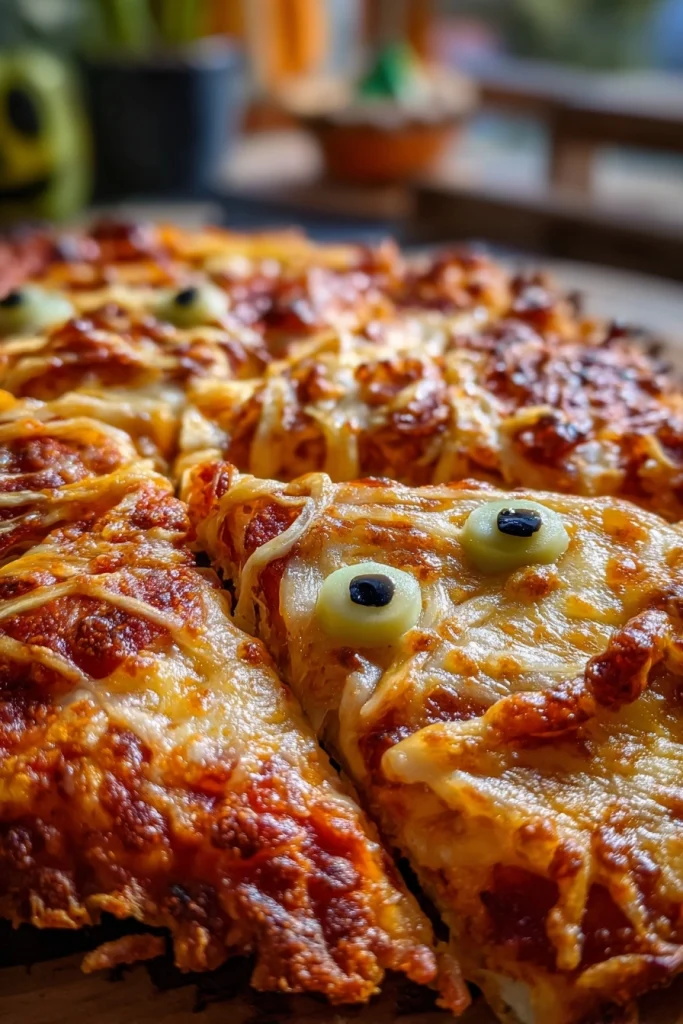
Introduction to Mini Mummy Pizzas
As the leaves turn and the air gets crisp, I find myself dreaming of fun Halloween treats. That’s where these delightful Mini Mummy Pizzas come in! They’re not just a quick solution for a busy day; they’re a way to bring a little spooky joy to your family’s dinner table. With their adorable mummy faces and delicious flavors, these mini pizzas are sure to impress your loved ones. Plus, they’re easy enough to whip up even on the busiest of nights. Let’s dive into this festive recipe that will make your Halloween celebrations extra special!
Why You’ll Love This Mini Mummy Pizzas
These Mini Mummy Pizzas are a lifesaver for busy moms like me! They come together in just 22 minutes, making them perfect for a quick weeknight dinner or a fun Halloween party snack. The best part? Kids love them! With their playful appearance and cheesy goodness, they’re sure to be a hit. Plus, you can customize them to suit your family’s tastes, making every bite a delightful surprise!
Ingredients for Mini Mummy Pizzas
Gathering the right ingredients is half the fun of cooking! For these Mini Mummy Pizzas, you’ll need a few simple items that you might already have in your pantry. Here’s what you’ll need:
- English muffins: These serve as the perfect base for your mini pizzas. They’re sturdy and hold up well under toppings.
- Pizza sauce: A flavorful sauce is essential for that classic pizza taste. You can use store-bought or homemade, depending on your time.
- String cheese: This is the star of the show! Cut into strips, it creates the mummy’s wrappings. Feel free to use mozzarella or any cheese you love.
- Olives: Sliced olives make for spooky eyes! If you’re not a fan, you can substitute with pepperoni or even cherry tomatoes.
- Italian seasoning: A sprinkle of this adds a burst of flavor. You can also use dried oregano or basil if that’s what you have on hand.
For those who want to get creative, consider adding toppings like bell peppers, mushrooms, or even a sprinkle of red pepper flakes for a kick. The beauty of these Mini Mummy Pizzas is their versatility! You can find the exact quantities for each ingredient at the bottom of the article, ready for printing.
How to Make Mini Mummy Pizzas
Now that we have our ingredients ready, let’s get cooking! Making these Mini Mummy Pizzas is a breeze, and I promise you’ll have a blast creating them. Follow these simple steps, and you’ll have a spooky treat in no time!
Step 1: Preheat the Oven
First things first, preheat your oven to 375°F (190°C). Preheating is crucial because it ensures that your Mini Mummy Pizzas bake evenly. A hot oven helps the cheese melt beautifully and gives that golden finish we all love!
Step 2: Prepare the Muffins
Next, slice your English muffins in half. Place them cut-side up on a baking sheet. This is where the magic happens! The muffins will act as the perfect canvas for your mummy creations. Make sure they’re spaced out a bit so they can bake evenly.
Step 3: Add Pizza Sauce
Now, grab your pizza sauce and spread it evenly over each muffin half. Don’t be shy—use a generous amount! This sauce is the flavor foundation of your Mini Mummy Pizzas. If you want an extra kick, consider adding a sprinkle of Italian seasoning to the sauce before spreading it.
Step 4: Create the Mummy Effect
Here comes the fun part! Take your string cheese and cut it into thin strips. Arrange these strips on top of the sauce to mimic mummy wrappings. Overlap them a bit for that authentic look. The more, the merrier! This is where your creativity shines.
Step 5: Add Olive Eyes
For the finishing touch, place two olive slices on each muffin half to create spooky eyes. This little detail adds character to your Mini Mummy Pizzas. If olives aren’t your thing, feel free to use pepperoni or even small dollops of cream cheese for a different look!
Step 6: Season and Bake
Before popping them in the oven, sprinkle a bit of Italian seasoning over the top. This adds a lovely aroma and flavor. Bake your Mini Mummy Pizzas in the preheated oven for about 10-12 minutes. Keep an eye on them; you want the cheese to be melted and bubbly!
Step 7: Cool and Serve
Once they’re out of the oven, let your Mini Mummy Pizzas cool for a few minutes. This helps the cheese set a bit, making them easier to handle. Serve them warm, and watch your family’s faces light up with delight!
Tips for Success
- Use fresh ingredients for the best flavor.
- Experiment with different cheeses for unique tastes.
- Make a double batch and freeze extras for quick snacks later.
- Involve your kids in the decorating process; it’s a fun activity!
- Serve with a side of veggies or a salad for a complete meal.
Equipment Needed
- Baking sheet: A standard one works great, but a pizza stone can give you a crispier base.
- Knife: For slicing the muffins and cheese. A pizza cutter can also be handy!
- Spatula: To help transfer the Mini Mummy Pizzas to a serving plate.
- Measuring cups: For accurate sauce portions, though you can eyeball it too!
Variations
- For a gluten-free option, use gluten-free English muffins or cauliflower crusts.
- Add cooked ground turkey or sausage for a heartier version.
- Try different cheeses like cheddar or pepper jack for a spicy twist.
- Incorporate veggies like spinach or bell peppers under the cheese for added nutrition.
- Make them mini by using cocktail-sized English muffins for bite-sized treats!
Serving Suggestions
- Pair your Mini Mummy Pizzas with a crisp green salad for a refreshing contrast.
- Serve with a side of carrot sticks and ranch dressing for a fun crunch.
- For drinks, consider apple cider or a spooky punch to keep the Halloween theme alive.
- Present them on a festive platter with Halloween-themed decorations for added flair.
FAQs about Mini Mummy Pizzas
Can I make Mini Mummy Pizzas ahead of time?
Absolutely! You can prepare the Mini Mummy Pizzas in advance and store them in the fridge. Just bake them right before serving for that fresh-out-of-the-oven taste!
What can I use instead of string cheese?
If string cheese isn’t your thing, feel free to use shredded cheese or even slices of mozzarella. Just make sure it melts well for that gooey, mummy effect!
How can I make these Mini Mummy Pizzas spicier?
For a spicy kick, try adding jalapeños or using pepper jack cheese. You can also sprinkle some red pepper flakes on top before baking!
Are Mini Mummy Pizzas suitable for kids?
Can I freeze Mini Mummy Pizzas?
Final Thoughts
Creating these Mini Mummy Pizzas is more than just cooking; it’s about making memories with your loved ones. The joy on your kids’ faces as they help decorate their spooky creations is priceless. Plus, the delightful aroma wafting through your kitchen will have everyone eagerly awaiting dinner. These pizzas are not only a fun Halloween treat but also a reminder that cooking can be a joyful experience, even on the busiest days. So, gather your family, unleash your creativity, and enjoy the deliciousness of these Mini Mummy Pizzas together. Happy Halloween cooking!
Mini Mummy Pizzas that Will Wow Your Halloween Guests!

Mini Mummy Pizzas are a fun and festive Halloween treat that will impress your guests with their spooky appearance and delicious taste.
- Prep Time: 10 minutes
- Cook Time: 12 minutes
- Total Time: 22 minutes
- Yield: 8 mini pizzas
- Category: Appetizer
- Method: Baking
- Cuisine: Italian
- Diet: Vegetarian
Ingredients
- English muffins – 4
- Pizza sauce – 1 cup
- String cheese – 8 sticks
- Olives – 16 slices
- Italian seasoning – 1 tsp
Instructions
- Preheat the oven to 375°F (190°C).
- Slice the English muffins in half and place them on a baking sheet.
- Spread pizza sauce evenly over each muffin half.
- Cut the string cheese into thin strips and place them on top of the sauce to create a mummy effect.
- Use olive slices for the eyes of the mummies.
- Sprinkle Italian seasoning over the top.
- Bake in the preheated oven for 10-12 minutes, or until the cheese is melted and bubbly.
- Remove from the oven and let cool slightly before serving.
Notes
- Feel free to customize the toppings to your liking.
- These can be made ahead of time and baked just before serving.
- Great for Halloween parties or as a fun family dinner.
Nutrition
- Serving Size: 1 mini pizza
- Calories: 150
- Sugar: 2g
- Sodium: 300mg
- Fat: 6g
- Saturated Fat: 3g
- Unsaturated Fat: 2g
- Trans Fat: 0g
- Carbohydrates: 18g
- Fiber: 1g
- Protein: 6g
- Cholesterol: 15mg