
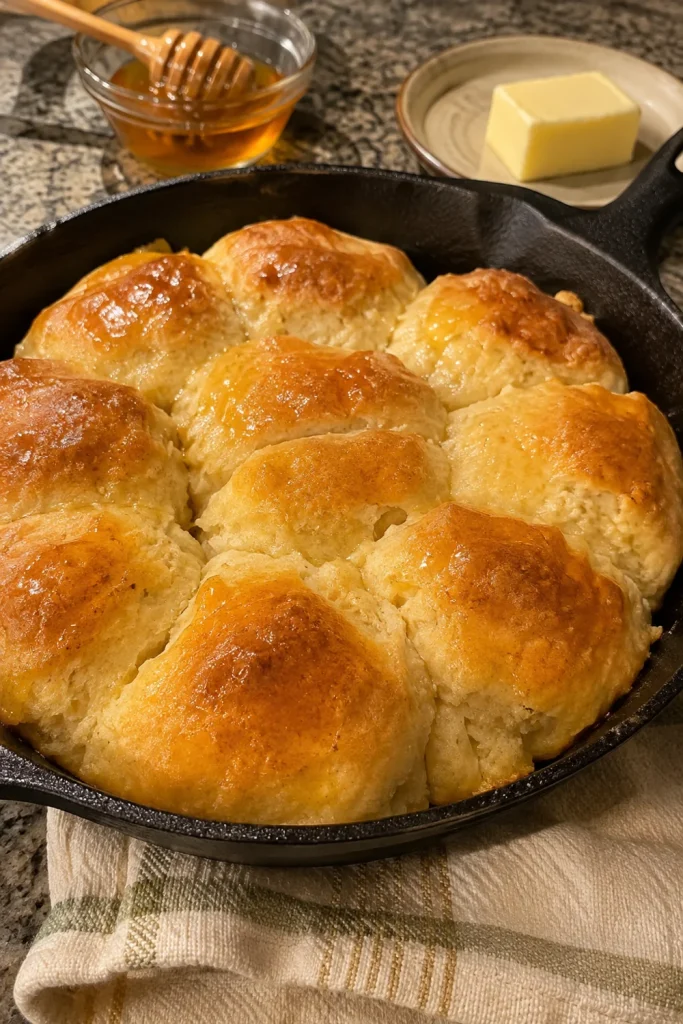
Gluten Free Honey Butter Skillet Rolls
As a busy mom, I know how precious time can be, especially when it comes to meal prep. That’s why I absolutely adore these Gluten Free Honey Butter Skillet Rolls. They’re not just a quick solution for a hectic day; they’re a delightful treat that can impress your loved ones. Imagine soft, fluffy rolls topped with a sweet honey butter glaze, fresh out of the oven. It’s like a warm hug for your taste buds! Whether it’s a family dinner or a cozy brunch, these rolls are sure to steal the show.
Why You’ll Love This Gluten Free Honey Butter Skillet Rolls
These Gluten Free Honey Butter Skillet Rolls are a game changer for busy families. They come together in just 40 minutes, making them perfect for last-minute meals. The taste? Absolutely divine! The combination of honey and butter creates a sweet, rich flavor that pairs beautifully with any dish. Plus, they’re gluten-free, so everyone can enjoy them without worry. Trust me, these rolls will quickly become a family favorite!
Ingredients for Gluten Free Honey Butter Skillet Rolls
Gathering the right ingredients is the first step to creating these delightful rolls. Here’s what you’ll need:
- Gluten-free all-purpose flour: This is the base of our rolls, providing the fluffy texture we crave. Look for a blend that includes xanthan gum for best results.
- Baking powder: This helps the rolls rise, giving them that light and airy feel. Make sure it’s fresh for optimal fluffiness.
- Salt: A pinch of salt enhances the flavors, balancing the sweetness of the honey.
- Honey: This natural sweetener adds a lovely flavor and moisture to the rolls. You can use local honey for a personal touch.
- Unsalted butter: Melted butter adds richness and helps create that soft texture. If you prefer, you can substitute with plant-based butter for a dairy-free option.
- Milk: Any milk works here, whether it’s dairy or a dairy-free alternative like almond or oat milk. It adds moisture to the dough.
- Egg: This binds the ingredients together and contributes to the rolls’ structure. For a vegan option, you can use a flax egg.
- Honey (for glaze): A little extra honey for the glaze makes these rolls irresistible. It adds a shiny finish and a sweet kick.
- Butter (for glaze): A touch of melted butter in the glaze gives it a rich flavor. Again, feel free to use a dairy-free alternative.
For exact measurements, check the bottom of the article where you can find everything listed for easy printing!
How to Make Gluten Free Honey Butter Skillet Rolls
Step 1: Preheat the Oven
Preheating your oven is crucial for baking success. Set it to 375°F (190°C) to ensure even cooking. This step helps the rolls rise beautifully, creating that fluffy texture we all love. Trust me, starting with a hot oven makes a world of difference!
Step 2: Mix Dry Ingredients
In a large bowl, combine the gluten-free all-purpose flour, baking powder, and salt. Whisk them together until well blended. This ensures that the baking powder is evenly distributed, which is key for those lovely, fluffy rolls. No one wants a dense roll, right?
Step 3: Combine Wet Ingredients
In another bowl, whisk together the honey, melted butter, milk, and egg. Make sure everything is well mixed. This mixture adds moisture and sweetness to the rolls. Plus, the melted butter helps create that rich flavor we crave in every bite!
Step 4: Combine Wet and Dry Ingredients
Now, gently fold the wet ingredients into the dry mixture. Stir until just combined; don’t overmix! A few lumps are perfectly fine. This keeps the rolls light and airy, which is exactly what we want for our Gluten Free Honey Butter Skillet Rolls.
Step 5: Prepare the Skillet
Grease your skillet with a bit of butter or cooking spray. Then, spoon the dough into the skillet, forming rolls. You can make them as big or small as you like. Just remember to leave some space between them, as they’ll puff up while baking!
Step 6: Bake the Rolls
Place the skillet in your preheated oven and bake for 20-25 minutes. Keep an eye on them! They should turn golden brown on top. To check for doneness, insert a toothpick in the center; it should come out clean. Perfectly baked rolls await!
Step 7: Prepare the Honey Butter Glaze
While the rolls are baking, melt the remaining butter and mix it with honey in a small bowl. This glaze will add a sweet, shiny finish to your rolls. It’s the icing on the cake, or in this case, the honey on the roll!
Step 8: Glaze and Serve
Once the rolls are out of the oven, brush the honey butter glaze generously over the top. Serve them warm for the best experience. These rolls are perfect on their own or as a side to your favorite meal. Enjoy every bite!
Tips for Success
- Always measure your gluten-free flour accurately for the best texture.
- Let the rolls cool slightly before glazing to prevent the glaze from melting away.
- Experiment with different types of honey for unique flavors.
- For extra fluffiness, let the dough rest for a few minutes before baking.
- Store leftover rolls in an airtight container to keep them fresh.
Equipment Needed
- Mixing bowls: A set of various sizes is handy. You can use any large bowl you have.
- Whisk: Essential for mixing ingredients. A fork works in a pinch!
- Skillet: A cast-iron skillet is ideal, but any oven-safe skillet will do.
- Measuring cups and spoons: Accurate measurements are key. Use any standard measuring tools you have.
- Toothpick: Perfect for checking doneness. A knife or skewer can work too!
Variations
- Herb-Infused Rolls: Add dried herbs like rosemary or thyme to the dough for a savory twist.
- Cheesy Delight: Mix in shredded cheese, such as cheddar or mozzarella, for a cheesy version that pairs well with soups.
- Spicy Kick: Incorporate a pinch of cayenne pepper or red pepper flakes for a subtle heat that contrasts beautifully with the sweetness.
- Fruit-Studded Rolls: Fold in dried fruits like cranberries or raisins for a sweet and chewy surprise in every bite.
- Nutty Addition: Add chopped nuts, such as walnuts or pecans, for a delightful crunch and added nutrition.
Serving Suggestions
- Pair these rolls with a warm bowl of soup for a comforting meal.
- Serve alongside a fresh salad for a light lunch option.
- Drizzle extra honey on top for an added touch of sweetness.
- Enjoy with a cup of herbal tea for a cozy afternoon snack.
- Present them in a rustic basket lined with a cloth for a charming touch.
FAQs about Gluten Free Honey Butter Skillet Rolls
Can I make these rolls ahead of time? Absolutely! You can prepare the dough and store it in the fridge for up to 24 hours. Just let it come to room temperature before baking. Freshly baked Gluten Free Honey Butter Skillet Rolls are always a hit!
What can I substitute for gluten-free flour? If you don’t have gluten-free all-purpose flour, you can try a homemade blend of almond flour and coconut flour. Just remember to adjust the liquid as needed, since different flours absorb moisture differently.
How do I store leftover rolls? Store any leftover rolls in an airtight container at room temperature for up to two days. You can also freeze them for longer storage. Just reheat in the oven for a few minutes before serving!
Can I use a different sweetener instead of honey? Yes! Maple syrup or agave nectar can be great alternatives. Just keep in mind that they may slightly alter the flavor and texture of your Gluten Free Honey Butter Skillet Rolls.
Are these rolls suitable for a vegan diet? You can easily make these rolls vegan by substituting the egg with a flax egg and using plant-based butter and milk. They’ll still be delicious and fluffy!
Summarizing the Joy of Gluten Free Honey Butter Skillet Rolls
There’s something truly magical about pulling a warm skillet of Gluten Free Honey Butter Skillet Rolls from the oven. The aroma fills your kitchen, wrapping you in a cozy embrace. Each bite is a delightful blend of sweetness and softness, making every meal feel special. Whether you’re sharing them with family or enjoying them solo, these rolls bring a sense of comfort and joy. They’re not just food; they’re a way to create memories around the table. So, roll up your sleeves and dive into this delicious adventure—you won’t regret it!
PrintGluten Free Honey Butter Skillet Rolls That You’ll Love
Deliciously soft and fluffy gluten-free rolls topped with a sweet honey butter glaze, perfect for any meal.
- Prep Time: 15 minutes
- Cook Time: 25 minutes
- Total Time: 40 minutes
- Yield: 12 rolls 1x
- Category: Bread
- Method: Baking
- Cuisine: American
- Diet: Gluten Free
Ingredients
- 2 cups gluten-free all-purpose flour
- 1 tablespoon baking powder
- 1/2 teaspoon salt
- 1/4 cup honey
- 1/4 cup unsalted butter, melted
- 1 cup milk (or dairy-free alternative)
- 1 egg
- 1/4 cup honey (for glaze)
- 2 tablespoons butter (for glaze)
Instructions
- Preheat your oven to 375°F (190°C).
- In a large bowl, mix together the gluten-free flour, baking powder, and salt.
- In another bowl, whisk together the honey, melted butter, milk, and egg.
- Combine the wet ingredients with the dry ingredients until just mixed.
- Grease a skillet and spoon the dough into the skillet, forming rolls.
- Bake for 20-25 minutes or until golden brown.
- While the rolls are baking, melt the butter and mix with honey for the glaze.
- Once the rolls are done, brush the honey butter glaze over the top.
- Serve warm and enjoy!
Notes
- For a dairy-free version, substitute with plant-based butter and milk.
- These rolls are best served fresh but can be stored in an airtight container for a couple of days.
- Feel free to add herbs or spices to the dough for extra flavor.
Nutrition
- Serving Size: 1 roll
- Calories: 180
- Sugar: 8g
- Sodium: 150mg
- Fat: 7g
- Saturated Fat: 4g
- Unsaturated Fat: 2g
- Trans Fat: 0g
- Carbohydrates: 25g
- Fiber: 1g
- Protein: 3g
- Cholesterol: 30mg