
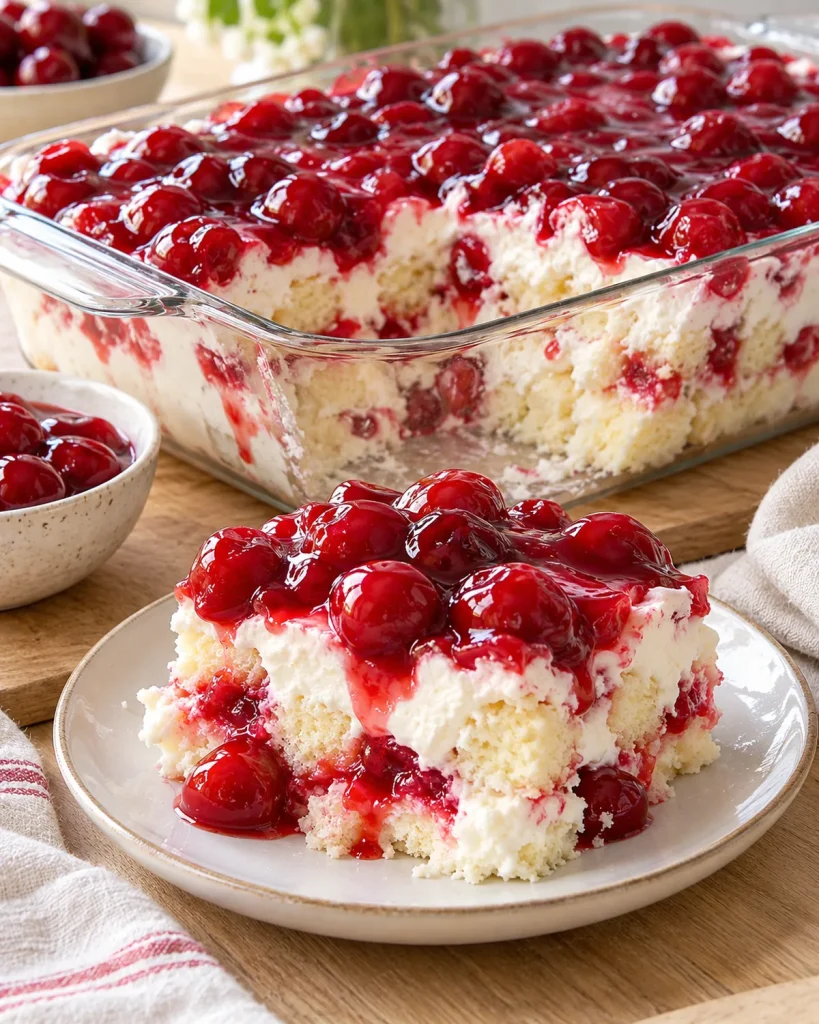
Gluten Free Cherries in the Snow Dessert
As a busy mom, I know how precious time can be, especially when it comes to whipping up something sweet. That’s why I adore this Gluten Free Cherries in the Snow Dessert. It’s a delightful treat that feels indulgent but is surprisingly simple to make. Imagine a creamy, fluffy topping paired with juicy cherries, all resting on a buttery crust. This dessert is perfect for impressing guests or simply enjoying a quiet evening at home. Plus, it’s gluten-free, making it a fantastic option for everyone at the table!
Why You’ll Love This Gluten Free Cherries in the Snow Dessert
This Gluten Free Cherries in the Snow Dessert is a lifesaver for busy days. It’s quick to prepare, taking just 20 minutes of hands-on time. The creamy texture and sweet cherries create a flavor explosion that will have everyone asking for seconds. Plus, it’s a no-bake recipe, so you can enjoy the process without heating up the kitchen. Trust me, this dessert will become a family favorite in no time!
Ingredients for Gluten Free Cherries in the Snow Dessert
Gathering the right ingredients is the first step to creating this delightful dessert. Here’s what you’ll need:
- Fresh or Frozen Cherries: These juicy gems are the star of the show. Fresh cherries add a burst of flavor, while frozen ones are a convenient option year-round.
- Heavy Cream: This is what gives our dessert its luscious, creamy texture. Whipping it transforms it into a fluffy cloud that pairs beautifully with the cherries.
- Powdered Sugar: A touch of sweetness is essential. You can adjust the amount based on your taste preference, making it as sweet as you like.
- Vanilla Extract: This adds a warm, aromatic flavor that enhances the overall taste of the dessert. Always opt for pure vanilla for the best results.
- Gluten-Free Graham Cracker Crumbs: These create the base of our dessert. They provide a crunchy texture that contrasts nicely with the creamy topping. You can find gluten-free options at most grocery stores.
- Unsalted Butter: Melted butter helps bind the crust together, giving it a rich flavor. Unsalted is preferred to control the saltiness of the dessert.
For those looking to mix things up, consider using canned cherries instead of fresh. Just make sure to drain them well to avoid excess moisture. You can find the exact measurements for each ingredient at the bottom of the article, ready for printing!
How to Make Gluten Free Cherries in the Snow Dessert
Now that we have our ingredients ready, let’s dive into the fun part—making this delightful dessert! Follow these simple steps, and you’ll have a stunning treat that’s sure to impress.
Step 1: Preheat the Oven
First things first, preheat your oven to 350°F (175°C). This step is crucial for our crust. Preheating ensures that the butter melts evenly, creating a perfectly crispy base. Trust me, a warm oven makes all the difference!
Step 2: Prepare the Crust
In a mixing bowl, combine the gluten-free graham cracker crumbs with the melted butter. Stir until the crumbs are fully coated. Then, take your mixture and press it firmly into the bottom of your baking dish. Use the back of a measuring cup or your fingers to create an even layer. This crust will be the sturdy foundation for our creamy topping!
Step 3: Whip the Cream
Next, grab your mixer and pour in the heavy cream. Whip it until soft peaks form—this means it should hold its shape but still be fluffy. Gradually add in the powdered sugar and vanilla extract while continuing to whip. This step is where the magic happens, transforming the cream into a light, airy cloud that will cradle our cherries.
Step 4: Fold in the Cherries
Now, it’s time to gently fold in the cherries. Use a spatula to scoop the cherries into the whipped cream. Be careful not to overmix; we want to keep that fluffy texture intact. Folding is like giving the cherries a cozy blanket of cream, ensuring every bite is a delightful surprise!
Step 5: Assemble the Dessert
Spread the cherry mixture evenly over the crust in your baking dish. Use a spatula to smooth it out, making sure every corner is covered. This is where the dessert starts to come together, and it’s looking oh-so-delicious already!
Step 6: Chill Before Serving
Finally, pop your dessert into the refrigerator for at least 2 hours. Chilling is essential for allowing the flavors to meld and the texture to set. It’s like giving your dessert a little time-out to become even more delightful. Trust me, the wait will be worth it!
Tips for Success
- Use fresh cherries when in season for the best flavor.
- Don’t skip the chilling step; it enhances the dessert’s texture.
- For a richer taste, try adding a splash of almond extract.
- Keep your heavy cream cold for easier whipping.
- Make this dessert a day ahead for even better flavor!
Equipment Needed
- Mixing Bowls: Use any size, but a large bowl is ideal for whipping cream.
- Electric Mixer: A hand mixer works great, but a stand mixer can save time.
- Baking Dish: A 9×9 inch dish is perfect, but any similar size will do.
- Spatula: A rubber spatula is best for folding and spreading.
- Measuring Cups: Essential for accurate ingredient portions.
Variations of Gluten Free Cherries in the Snow Dessert
- Chocolate Drizzle: Add a rich chocolate drizzle on top for an indulgent twist. Melt some gluten-free chocolate and drizzle it over the chilled dessert before serving.
- Nutty Crunch: Mix in some chopped nuts, like almonds or pecans, into the cherry mixture for added texture and flavor.
- Berry Medley: Swap out cherries for a mix of berries, such as strawberries and blueberries, for a colorful and fruity variation.
- Vegan Option: Substitute heavy cream with coconut cream and use maple syrup instead of powdered sugar for a dairy-free version.
- Spiced Up: Add a pinch of cinnamon or nutmeg to the whipped cream for a warm, cozy flavor that complements the cherries beautifully.
Serving Suggestions for Gluten Free Cherries in the Snow Dessert
- Pair with Whipped Cream: A dollop of extra whipped cream on top adds a delightful touch.
- Serve with Ice Cream: Vanilla or almond ice cream complements the cherries beautifully.
- Garnish with Mint: Fresh mint leaves add a pop of color and freshness.
- Enjoy with Coffee: A cup of coffee or tea balances the sweetness perfectly.
- Presentation: Serve in individual cups for a charming, elegant touch.
FAQs about Gluten Free Cherries in the Snow Dessert
Can I use canned cherries instead of fresh? Absolutely! Canned cherries work well, just make sure to drain them thoroughly to avoid excess moisture. This way, your Gluten Free Cherries in the Snow Dessert will still have that delightful texture.
How long can I store leftovers? If you have any leftovers (which is rare!), you can store them in the refrigerator for up to three days. Just cover the dish tightly to keep it fresh and delicious.
Can I make this dessert vegan? Yes! To create a vegan version of this Gluten Free Cherries in the Snow Dessert, substitute heavy cream with coconut cream and use maple syrup instead of powdered sugar. It’s just as delightful!
What can I serve with this dessert? This dessert pairs beautifully with a dollop of whipped cream or a scoop of vanilla ice cream. A sprinkle of fresh mint on top adds a lovely touch, too!
Is this dessert suitable for kids? Definitely! Kids love the sweet cherries and fluffy cream. Plus, it’s a fun way to introduce them to gluten-free treats without sacrificing flavor!
Summarizing the Joy of Gluten Free Cherries in the Snow Dessert
Creating this Gluten Free Cherries in the Snow Dessert is like wrapping your loved ones in a warm, sweet hug. The combination of creamy whipped topping and juicy cherries brings a smile to everyone’s face. It’s a dessert that not only satisfies your sweet tooth but also creates cherished memories around the table. Whether you’re celebrating a special occasion or simply enjoying a quiet evening, this treat is sure to elevate the moment. Plus, knowing it’s gluten-free means everyone can indulge without worry. Trust me, this dessert will become a beloved staple in your home!
PrintGluten Free Cherries in the Snow Dessert is Irresistible!
A delightful and creamy dessert featuring cherries and a fluffy topping, perfect for those seeking a gluten-free treat.
- Prep Time: 20 minutes
- Cook Time: 10 minutes
- Total Time: 2 hours 30 minutes
- Yield: 8 servings 1x
- Category: Dessert
- Method: No-Bake
- Cuisine: American
- Diet: Gluten Free
Ingredients
- 2 cups fresh or frozen cherries
- 1 cup heavy cream
- 1/2 cup powdered sugar
- 1 teaspoon vanilla extract
- 1 cup gluten-free graham cracker crumbs
- 1/4 cup unsalted butter, melted
Instructions
- Preheat the oven to 350°F (175°C).
- In a bowl, combine gluten-free graham cracker crumbs and melted butter, then press into the bottom of a baking dish.
- In another bowl, whip the heavy cream until soft peaks form, then gradually add powdered sugar and vanilla extract.
- Fold in the cherries gently into the whipped cream mixture.
- Spread the cherry mixture over the crust in the baking dish.
- Chill in the refrigerator for at least 2 hours before serving.
Notes
- For a sweeter dessert, adjust the amount of powdered sugar to taste.
- Fresh cherries can be substituted with canned cherries, but ensure they are drained well.
- This dessert can be made a day in advance for convenience.
Nutrition
- Serving Size: 1 slice
- Calories: 250
- Sugar: 18g
- Sodium: 50mg
- Fat: 15g
- Saturated Fat: 9g
- Unsaturated Fat: 4g
- Trans Fat: 0g
- Carbohydrates: 30g
- Fiber: 1g
- Protein: 3g
- Cholesterol: 40mg