
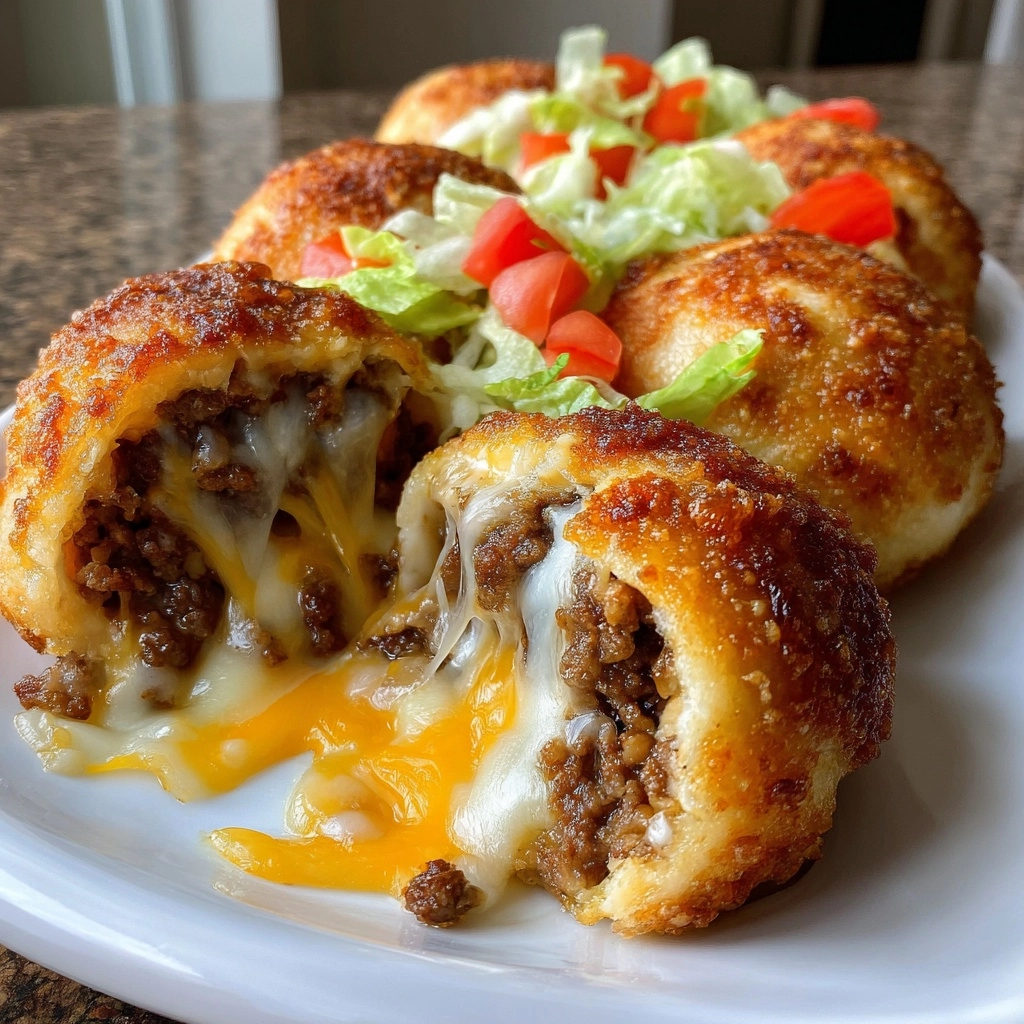
Introduction to Cheeseburger Bombs
Hey there, fellow food lovers! If you’re anything like me, you know that life can get pretty hectic. Between juggling work, family, and everything in between, finding time to whip up a delicious meal can feel like a daunting task. That’s where these cheeseburger bombs come in! They’re the perfect bite-sized treats that pack all the flavors of a classic cheeseburger into a flaky, golden dough. Whether you’re looking for a quick solution for a busy day or a fun dish to impress your loved ones, these little bombs are sure to be a hit!
Why You’ll Love This Cheeseburger Bombs
These cheeseburger bombs are a game-changer for busy moms and professionals alike! They’re incredibly easy to make, taking just 35 minutes from start to finish. The taste? Absolutely mouthwatering! Each bite is a delightful explosion of cheesy, savory goodness that will satisfy even the pickiest eaters. Plus, they’re perfect for meal prep, making them a fantastic option for those hectic weeknights when you need something quick and delicious!
Ingredients for Cheeseburger Bombs
Let’s gather our ingredients for these delightful cheeseburger bombs. Each component plays a vital role in creating that irresistible flavor combination. Here’s what you’ll need:
- Ground beef: The star of the show! Choose lean ground beef for a healthier option, or go for a bit more fat for extra flavor.
- Shredded cheddar cheese: This melty goodness adds that classic cheeseburger taste. Feel free to swap it with your favorite cheese, like pepper jack for a spicy kick!
- Diced onions: They bring a sweet and savory crunch. If your family isn’t a fan, you can leave them out or use green onions for a milder flavor.
- Ketchup: A must-have for that tangy sweetness. You can also use barbecue sauce for a smoky twist!
- Mustard: This adds a zesty kick. Yellow mustard is traditional, but Dijon or spicy brown can elevate the flavor.
- Refrigerated biscuit dough: The flaky outer layer that holds everything together. You can use crescent roll dough if you prefer a different texture.
- Salt and pepper: Essential for seasoning. Don’t skip these; they enhance all the flavors in your filling!
For those who love to customize, consider adding optional ingredients like pickles, cooked bacon, or even jalapeños for a spicy surprise! You can find the exact quantities for each ingredient at the bottom of the article, ready for printing. Happy cooking!
How to Make Cheeseburger Bombs
Now that we have our ingredients ready, let’s dive into the fun part—making these delicious cheeseburger bombs! Follow these simple steps, and you’ll have a tasty treat in no time.
Step 1: Preheat the Oven
First things first, preheat your oven to 375°F (190°C). Preheating is crucial because it ensures that your cheeseburger bombs bake evenly. A hot oven helps achieve that golden, flaky crust we all love!
Step 2: Cook the Beef and Onions
In a skillet, cook the ground beef and diced onions over medium heat. Stir occasionally until the beef is browned and the onions are soft. This usually takes about 5-7 minutes. Make sure to drain any excess fat to keep your bombs from being greasy. Browning the beef adds depth to the flavor, making each bite even more satisfying!
Step 3: Mix in the Condiments
Once your beef and onions are cooked, it’s time to mix in the condiments. Add ketchup, mustard, salt, and pepper to the skillet. Stir everything together until well combined. This mixture is the heart of your cheeseburger bombs, so make sure it’s flavorful!
Step 4: Prepare the Biscuit Dough
Next, roll out the refrigerated biscuit dough on a clean surface. Use a rolling pin to flatten it slightly. Then, cut each biscuit into a larger circle. This will give you enough space to hold all that delicious filling. If you’re using crescent roll dough, just unroll it and pinch the seams together.
Step 5: Fill the Dough
Now comes the fun part—filling the dough! Place a spoonful of the beef mixture and a sprinkle of shredded cheddar cheese in the center of each dough circle. Be careful not to overfill; about a tablespoon of filling should do. Overfilling can lead to messy bombs that burst open while baking!
Step 6: Seal the Bombs
To seal the bombs, fold the dough over the filling and pinch the edges tightly. Make sure there are no gaps, or the filling might escape during baking. You want each bomb to be a little surprise of cheesy goodness when you bite into it!
Step 7: Bake the Cheeseburger Bombs
Place the sealed bombs on a baking sheet lined with parchment paper. Bake them in the preheated oven for 15-20 minutes, or until they’re golden brown. Keep an eye on them; every oven is different! You’ll know they’re done when they look irresistible and smell amazing!
Step 8: Cool and Serve
Once baked, let the cheeseburger bombs cool slightly before serving. This helps the filling set a bit, making them easier to eat. Serve them warm with extra ketchup or mustard for dipping. Enjoy the smiles on your family’s faces as they dig into these tasty treats!
Tips for Success
- Use lean ground beef for a healthier option, but don’t shy away from a bit of fat for flavor.
- Make sure to drain excess fat after cooking the beef to keep your bombs from being greasy.
- Experiment with different cheeses for unique flavors—pepper jack adds a nice kick!
- Don’t overfill the dough; a tablespoon of filling is just right.
- Let the bombs cool slightly before serving to avoid burning your mouth!
Equipment Needed
- Skillet: A non-stick skillet works best, but any frying pan will do.
- Rolling pin: If you don’t have one, a wine bottle can serve as a great alternative!
- Baking sheet: Line it with parchment paper for easy cleanup.
- Measuring spoons: Essential for accurate ingredient portions.
- Spatula: Perfect for mixing and serving your delicious bombs!
Variations
- Spicy Cheeseburger Bombs: Add diced jalapeños or a splash of hot sauce to the beef mixture for a fiery kick!
- Veggie Bombs: Substitute ground beef with cooked lentils or black beans for a vegetarian option. Add chopped bell peppers and mushrooms for extra flavor.
- Cheesy Bacon Bombs: Mix in crumbled cooked bacon with the beef for a smoky, savory twist that bacon lovers will adore!
- BBQ Cheeseburger Bombs: Replace ketchup with your favorite barbecue sauce for a sweet and tangy flavor profile.
- Gluten-Free Option: Use gluten-free biscuit dough to make these bombs suitable for those with gluten sensitivities.
Serving Suggestions
- Pair your cheeseburger bombs with crispy sweet potato fries for a delightful contrast.
- Serve with a fresh garden salad to balance the richness of the bombs.
- Offer a variety of dipping sauces like ranch or spicy mayo for extra flavor.
- For drinks, consider pairing with a cold soda or a refreshing iced tea.
- Present them on a colorful platter for a fun, inviting look!
FAQs about Cheeseburger Bombs
As I’ve shared my love for these cheeseburger bombs, I know you might have a few questions. Here are some common queries that pop up, along with my answers to help you out!
Can I make cheeseburger bombs ahead of time?
Absolutely! You can prepare the bombs, seal them, and freeze them before baking. Just pop them in the oven when you’re ready for a quick meal!
What can I use instead of ground beef?
If you’re looking for alternatives, ground turkey or chicken works well. For a vegetarian option, try using lentils or black beans mixed with your favorite veggies!
How do I store leftovers?
Store any leftover cheeseburger bombs in an airtight container in the fridge for up to three days. Reheat them in the oven for the best texture!
Can I customize the filling?
Definitely! Feel free to add your favorite toppings like pickles, jalapeños, or even different cheeses. The possibilities are endless!
What’s the best way to serve these bombs?
Serve them warm with a side of dipping sauces like ketchup, mustard, or ranch. They make a fantastic appetizer or snack for any gathering!
Final Thoughts
Making cheeseburger bombs is more than just cooking; it’s about creating joyful moments in the kitchen. These delightful bites bring the whole family together, whether for a casual weeknight dinner or a fun gathering with friends. The aroma wafting through your home as they bake is simply irresistible! Plus, the smiles on your loved ones’ faces when they take that first bite? Priceless! So, roll up your sleeves, gather your ingredients, and let the magic happen. I promise, these little bombs will become a cherished favorite in your home, just like they have in mine!
PrintCheeseburger Bombs: Discover the Ultimate Easy Recipe!

Cheeseburger bombs are delicious, bite-sized treats filled with ground beef, cheese, and seasonings, all wrapped in a golden, flaky dough.
- Prep Time: 15 minutes
- Cook Time: 20 minutes
- Total Time: 35 minutes
- Yield: 12 servings 1x
- Category: Appetizer
- Method: Baking
- Cuisine: American
- Diet: Gluten Free
Ingredients
- 1 lb ground beef
- 1 cup shredded cheddar cheese
- 1/2 cup diced onions
- 1/4 cup ketchup
- 1 tsp mustard
- 1 package refrigerated biscuit dough
- Salt and pepper to taste
Instructions
- Preheat the oven to 375°F (190°C).
- In a skillet, cook the ground beef and onions over medium heat until the beef is browned. Drain excess fat.
- Add ketchup, mustard, salt, and pepper to the beef mixture and stir well.
- Roll out the biscuit dough and cut each biscuit into a larger circle.
- Place a spoonful of the beef mixture and a sprinkle of cheese in the center of each dough circle.
- Fold the dough over the filling and pinch to seal.
- Place the bombs on a baking sheet and bake for 15-20 minutes or until golden brown.
- Let cool slightly before serving.
Notes
- Feel free to customize the filling with your favorite toppings like pickles or bacon.
- Serve with additional ketchup or mustard for dipping.
- These can be made ahead of time and frozen before baking.
Nutrition
- Serving Size: 1 bomb
- Calories: 250
- Sugar: 2g
- Sodium: 400mg
- Fat: 15g
- Saturated Fat: 6g
- Unsaturated Fat: 8g
- Trans Fat: 0g
- Carbohydrates: 20g
- Fiber: 1g
- Protein: 10g
- Cholesterol: 30mg