
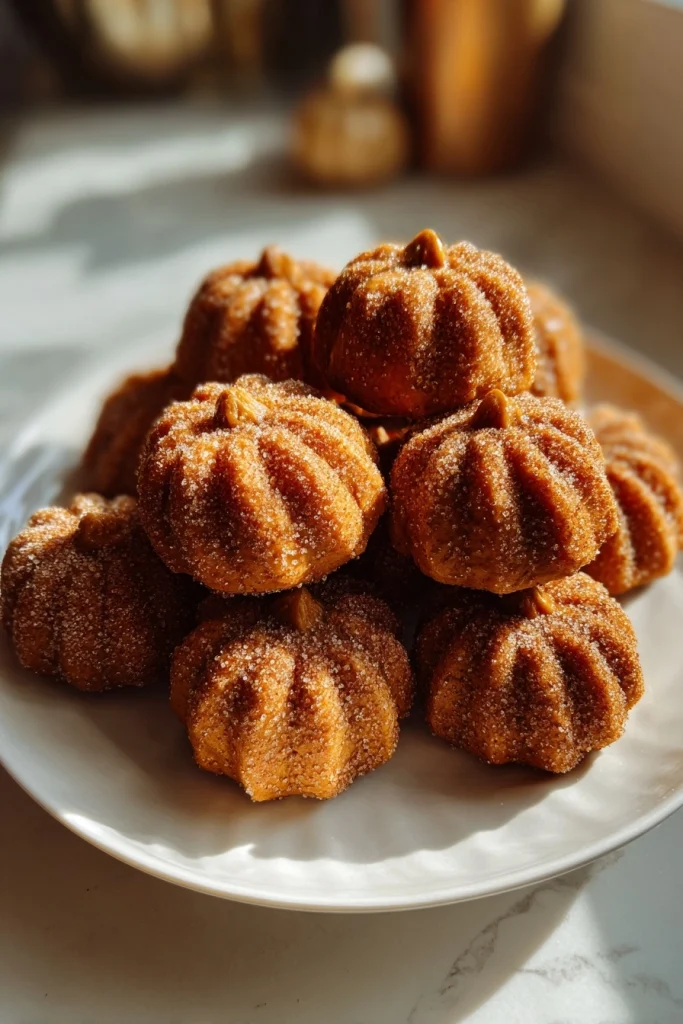
Introduction to Biscoff Pumpkins
As the leaves turn and the air gets crisp, I find myself craving cozy treats that capture the essence of fall. That’s where these delightful Biscoff pumpkins come in! They’re not just adorable; they’re a quick solution for busy days when you want to impress your loved ones without spending hours in the kitchen. With just a handful of ingredients, you can whip up these no-bake delights that are sure to bring smiles. Trust me, once you try these, they’ll become a staple in your autumn celebrations!
Why You’ll Love This Biscoff Pumpkins
These Biscoff pumpkins are a dream come true for busy moms and professionals alike. They’re incredibly easy to make, requiring no baking at all! In just 30 minutes, you can create a delightful dessert that’s both fun and festive. Plus, the rich, spiced flavor of Biscoff cookies combined with creamy filling is simply irresistible. Your family will love them, and you’ll love how little time they take!
Ingredients for Biscoff Pumpkins
Gathering the right ingredients is the first step to creating these charming Biscoff pumpkins. Here’s what you’ll need:
- Biscoff cookie crumbs: The star of the show! These cookies bring a warm, spiced flavor that’s perfect for fall.
- Cream cheese: This adds a rich, creamy texture that balances the sweetness of the cookies beautifully.
- Powdered sugar: A touch of sweetness to enhance the flavor without being overpowering.
- Vanilla extract: Just a splash adds depth and warmth to the mixture.
- Orange food coloring: Essential for achieving that vibrant pumpkin hue. You can adjust the amount to get your desired shade.
- Green candy melts: These are perfect for creating cute leaves and stems, adding a fun pop of color to your pumpkins.
For those looking to spice things up, consider adding a pinch of cinnamon to the mixture for an extra layer of flavor. If you’re short on time, you can also use store-bought Biscoff cookie crumbs instead of crushing the cookies yourself.
Don’t forget, the exact quantities of these ingredients are listed at the bottom of the article for easy printing!
How to Make Biscoff Pumpkins
Making these adorable Biscoff pumpkins is a breeze! Follow these simple steps, and you’ll have a delightful treat ready in no time. Let’s dive in!
Step 1: Mix the Base
Start by grabbing a large mixing bowl. Combine the Biscoff cookie crumbs, softened cream cheese, powdered sugar, and vanilla extract. Use a spatula or your hands to mix everything together until it’s well combined. The mixture should be smooth and slightly sticky. This is where the magic begins, as the flavors meld together beautifully!
Step 2: Add Color
Now, it’s time to bring your pumpkins to life! Add a few drops of orange food coloring to the mixture. Stir it in until you achieve your desired pumpkin hue. Don’t be shy—mix it well! You want that vibrant color to shine through, making your Biscoff pumpkins as eye-catching as they are delicious.
Step 3: Shape the Pumpkins
With your colorful mixture ready, it’s time to shape those pumpkins! Take small portions of the mixture and roll them into balls, then gently press them to form a pumpkin shape. Aim for about the size of a golf ball. You can even create little ridges with your fingers to mimic the natural lines of a pumpkin. This step is where you can let your creativity shine!
Step 4: Create Leaves and Stems
Next, let’s add some finishing touches! Melt the green candy melts according to the package instructions. Once melted, use a small spoon or piping bag to create leaves and stems on top of each pumpkin. This is where your Biscoff pumpkins will really come to life, adding that festive flair that everyone will love!
Step 5: Chill Before Serving
Finally, it’s time to chill! Place your beautifully crafted Biscoff pumpkins in the refrigerator for at least 30 minutes. This helps them firm up and makes them easier to handle. Plus, the chilling time allows the flavors to meld even more. Trust me, the wait will be worth it!
Tips for Success
- Make sure your cream cheese is softened for easy mixing.
- Use a cookie scoop for uniform pumpkin shapes.
- Experiment with different colors of candy melts for a fun twist.
- Chill the pumpkins longer if you prefer a firmer texture.
- Store leftovers in an airtight container in the fridge for up to a week.
Equipment Needed
- Mixing bowl: A large bowl for combining ingredients. A sturdy plate can work in a pinch.
- Spatula: Perfect for mixing and scraping. A wooden spoon is a great alternative.
- Cookie scoop: For uniform shapes. You can also use your hands if you prefer.
- Microwave-safe bowl: For melting candy melts. A small saucepan can be used for stovetop melting.
Variations
- Spiced Biscoff Pumpkins: Add a pinch of cinnamon or nutmeg to the mixture for a warm, spiced flavor that enhances the fall vibe.
- Chocolate Drizzle: Melt some chocolate and drizzle it over the pumpkins for an extra layer of sweetness and a beautiful presentation.
- Gluten-Free Option: Use gluten-free Biscoff cookies to make these pumpkins suitable for those with gluten sensitivities.
- Vegan Adaptation: Substitute cream cheese with a vegan cream cheese alternative and use dairy-free candy melts for a plant-based treat.
- Mini Pumpkins: Shape smaller versions for bite-sized treats that are perfect for parties or gatherings.
Serving Suggestions for Biscoff Pumpkins
- Pair these delightful Biscoff pumpkins with a warm cup of spiced chai or apple cider for a cozy fall treat.
- Serve them on a festive platter, surrounded by colorful autumn leaves for a beautiful presentation.
- For a fun twist, add a scoop of vanilla ice cream on the side for a creamy contrast.
FAQs about Biscoff Pumpkins
As I’ve shared my love for these delightful Biscoff pumpkins, I often get questions from fellow home cooks. Here are some of the most common queries I’ve encountered, along with my answers to help you on your culinary journey!
Can I make Biscoff pumpkins ahead of time?
Absolutely! These no-bake treats can be made a day in advance. Just store them in an airtight container in the refrigerator. They’ll be just as delicious when you’re ready to serve them!
What can I use instead of cream cheese?
If you’re looking for a dairy-free option, try using a vegan cream cheese alternative. It works beautifully and keeps the creamy texture intact. You won’t miss a beat!
How do I store leftover Biscoff pumpkins?
Store any leftovers in an airtight container in the fridge. They’ll stay fresh for up to a week. Just be sure to keep them chilled to maintain their shape and flavor.
Can I use other cookie flavors?
Of course! While Biscoff cookies are a favorite, you can experiment with other cookie flavors like ginger snaps or chocolate cookies. Just adjust the sweetness as needed!
What’s the best way to serve Biscoff pumpkins?
These pumpkins are perfect for fall gatherings! Serve them on a festive platter with seasonal decorations, or pair them with warm drinks like apple cider for a cozy touch.
Final Thoughts
Creating these Biscoff pumpkins is more than just making a dessert; it’s about bringing joy to your kitchen and your loved ones. The smiles on their faces as they bite into these delightful treats are priceless. Plus, the ease of preparation means you can spend more time enjoying the moment rather than stressing over complicated recipes. Whether it’s a cozy family gathering or a festive celebration, these no-bake pumpkins are sure to be a hit. So, roll up your sleeves, get creative, and let the flavors of fall fill your home with warmth and happiness!
Biscoff pumpkins: Discover Irresistible Recipes Today!
Delicious and creative recipes featuring Biscoff cookies shaped like pumpkins, perfect for fall celebrations.
- Prep Time: 20 minutes
- Cook Time: 0 minutes
- Total Time: 30 minutes
- Yield: 12 servings 1x
- Category: Dessert
- Method: No-bake
- Cuisine: American
- Diet: Vegetarian
Ingredients
- 1 cup Biscoff cookie crumbs
- 1/2 cup cream cheese, softened
- 1/4 cup powdered sugar
- 1/2 teaspoon vanilla extract
- Orange food coloring
- Green candy melts for decoration
Instructions
- In a bowl, mix Biscoff cookie crumbs, cream cheese, powdered sugar, and vanilla extract until well combined.
- Add orange food coloring to the mixture until the desired pumpkin color is achieved.
- Shape the mixture into small pumpkin shapes.
- Melt green candy melts and use them to create leaves and stems on the pumpkins.
- Chill the pumpkins in the refrigerator for at least 30 minutes before serving.
Notes
- For a spicier flavor, consider adding a pinch of cinnamon to the mixture.
- These can be made ahead of time and stored in the refrigerator.
- Use different colors of candy melts for a fun variety.
Nutrition
- Serving Size: 1 pumpkin
- Calories: 150
- Sugar: 10g
- Sodium: 50mg
- Fat: 8g
- Saturated Fat: 4g
- Unsaturated Fat: 2g
- Trans Fat: 0g
- Carbohydrates: 18g
- Fiber: 1g
- Protein: 2g
- Cholesterol: 20mg