
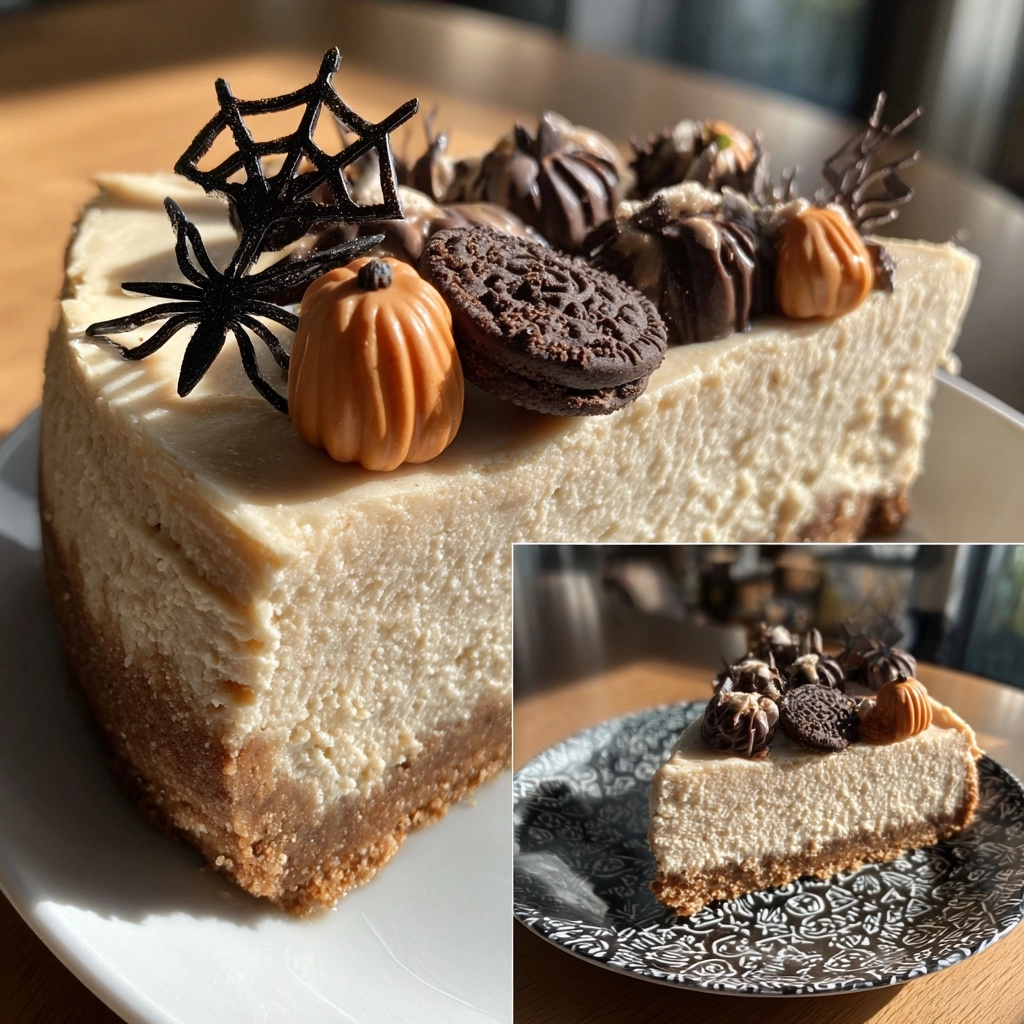
Introduction to Halloween Cheesecake: A Spooky Twist on a Classic Dessert
As the leaves turn and the air gets crisp, I find myself dreaming of Halloween treats. This Halloween Cheesecake: A Spooky Twist on a Classic Dessert is the perfect way to celebrate the season. It’s not just a dessert; it’s a delightful experience that brings family and friends together. Whether you’re a busy mom juggling work and kids or a professional looking to impress at a gathering, this cheesecake is your go-to solution. With its creamy pumpkin flavor and festive flair, it’s sure to be a hit at any Halloween celebration!
Why You’ll Love This Halloween Cheesecake
This Halloween Cheesecake is a dream come true for busy cooks like us! It’s easy to whip up, taking just a little over an hour of hands-on time. The creamy pumpkin filling is a delightful twist on the classic cheesecake, making it a crowd-pleaser. Plus, it’s a fantastic way to get the kids involved in the kitchen. Trust me, they’ll love decorating it as much as eating it!
Ingredients for Halloween Cheesecake
Gathering the right ingredients is the first step to creating this spooky delight. Here’s what you’ll need:
- Graham cracker crumbs: These form the base of your cheesecake crust, adding a sweet crunch.
- Unsalted butter: Melted butter binds the crumbs together, giving the crust its rich flavor.
- Granulated sugar: This sweetens both the crust and the filling, balancing the flavors perfectly.
- Cream cheese: The star of the show! Softened cream cheese creates that creamy, dreamy texture we all love.
- Vanilla extract: A splash of vanilla enhances the overall flavor, making it even more delicious.
- Eggs: They provide structure and stability to the cheesecake, ensuring it sets beautifully.
- Pumpkin puree: This is where the magic happens! It adds a lovely autumn flavor and a beautiful color.
- Ground cinnamon: A warm spice that brings out the cozy fall vibes.
- Ground nutmeg: Just a pinch adds depth and a hint of warmth to the filling.
- Ground ginger: This spice gives a little zing, enhancing the pumpkin flavor.
- Salt: A small amount balances the sweetness and enhances all the flavors.
- Whipped cream: For topping, it adds a light, fluffy finish that’s perfect for Halloween.
- Halloween-themed decorations: Optional, but they can turn your cheesecake into a festive centerpiece!
For exact measurements, check the bottom of the article where you can find everything listed for easy printing. Happy baking!
How to Make Halloween Cheesecake: A Spooky Twist on a Classic Dessert
Now that we have our ingredients ready, let’s dive into the fun part—making this Halloween Cheesecake! Follow these simple steps, and you’ll have a delicious dessert that’s sure to impress.
Step 1: Preheat the Oven
First things first, preheat your oven to 325°F (160°C). Preheating is crucial for baking cheesecake. It ensures even cooking and helps achieve that perfect creamy texture. Trust me, you don’t want to skip this step!
Step 2: Prepare the Crust
In a mixing bowl, combine your graham cracker crumbs and melted butter. Stir until the crumbs are fully coated. Then, press this mixture firmly into the bottom of your springform pan. Make sure it’s even and compact. This crust will be the delicious foundation for your cheesecake!
Step 3: Mix the Filling
In a large mixing bowl, beat the softened cream cheese and granulated sugar together until smooth. This is where the magic begins! Next, add the eggs one at a time, mixing well after each addition. This step is vital; it helps create a light and fluffy filling. Don’t rush it—take your time!
Step 4: Add Pumpkin and Spices
Now, it’s time to add the pumpkin puree along with the ground cinnamon, nutmeg, ginger, and salt. Stir until everything is well combined. The pumpkin and spices bring that cozy fall flavor to your cheesecake, making it a true Halloween treat!
Step 5: Bake the Cheesecake
Pour the cheesecake mixture over your prepared crust in the springform pan. Bake it in the preheated oven for 60-70 minutes. You’ll know it’s done when the center is set but still slightly jiggly. This slight jiggle is a good sign—it means your cheesecake will be creamy!
Step 6: Cooling Process
Once baked, turn off the oven and let the cheesecake cool inside with the door ajar for about an hour. This cooling process is essential for achieving the right texture. It helps prevent cracks and keeps your cheesecake nice and smooth.
Step 7: Refrigerate and Decorate
After cooling, refrigerate your cheesecake for at least 4 hours, or overnight if you can wait! Chilling allows the flavors to meld beautifully. When you’re ready to serve, top it with whipped cream and your favorite Halloween-themed decorations. Get creative—this is the fun part!
Tips for Success
- Use room temperature cream cheese for a smoother filling.
- Don’t overmix the batter; it can lead to cracks.
- For a firmer cheesecake, bake a little longer, but keep an eye on it!
- Let the cheesecake cool completely before refrigerating to avoid condensation.
- Experiment with food coloring for a spooky look!
Equipment Needed for Halloween Cheesecake
- Springform pan: Essential for easy removal; a regular cake pan works too, but it may be harder to serve.
- Mixing bowls: Use any size you have; just ensure they’re large enough for mixing.
- Electric mixer: A hand mixer is great, but a stand mixer can save time.
- Spatula: Perfect for scraping down the sides of the bowl.
- Measuring cups and spoons: Accurate measurements are key for baking success!
Variations of Halloween Cheesecake
- Chocolate Swirl: Add melted chocolate to the filling for a rich, decadent twist. Swirl it in before baking for a marbled effect.
- Gluten-Free Option: Substitute graham cracker crumbs with gluten-free cookies or almond flour for a delicious gluten-free crust.
- Vegan Version: Use vegan cream cheese and replace eggs with flaxseed meal mixed with water for a plant-based delight.
- Cheesecake Bars: Pour the batter into a lined baking dish instead of a springform pan for easy-to-cut cheesecake bars.
- Spiced Apple Topping: Top with sautéed apples and a sprinkle of cinnamon for a delightful fall-inspired addition.
Serving Suggestions for Halloween Cheesecake
- Pair with a warm cup of spiced apple cider for a cozy fall treat.
- Serve alongside a scoop of vanilla ice cream for an extra indulgent dessert.
- Garnish with chocolate shavings or crushed candy corn for a festive touch.
- Present on a spooky-themed platter to enhance the Halloween vibe.
- Offer a side of caramel sauce for drizzling—yum!
FAQs about Halloween Cheesecake: A Spooky Twist on a Classic Dessert
Can I make this Halloween Cheesecake ahead of time?
Absolutely! This cheesecake actually tastes better after chilling overnight. Just make sure to cover it well in the fridge to keep it fresh.
What can I use instead of pumpkin puree?
If you can’t find pumpkin puree, you can substitute it with mashed sweet potatoes or butternut squash. Both will give you a similar texture and flavor!
How do I know when my cheesecake is done baking?
Look for a slightly jiggly center when you take it out of the oven. It will continue to set as it cools, ensuring a creamy texture.
Can I freeze Halloween Cheesecake?
Yes, you can freeze it! Just wrap it tightly in plastic wrap and then in aluminum foil. It can last up to three months in the freezer. Thaw it in the fridge before serving.
What are some fun decoration ideas for my Halloween Cheesecake?
Get creative! Use whipped cream to create spooky ghosts, or add candy eyes and chocolate spiders. Edible glitter or colored sprinkles can also add a festive touch!
Final Thoughts on Halloween Cheesecake
Making this Halloween Cheesecake: A Spooky Twist on a Classic Dessert is more than just baking; it’s about creating memories. The joy of mixing ingredients, the aroma wafting through your kitchen, and the excitement of decorating with your loved ones all add to the experience. Each slice is a celebration of flavors and fun, perfect for sharing with family and friends. So, whether you’re hosting a Halloween party or enjoying a cozy night in, this cheesecake will surely bring smiles and delight. Embrace the season, and let this dessert be the highlight of your Halloween festivities!
Halloween Cheesecake: Discover a Spooky Twist Today!
A delicious Halloween-themed cheesecake that combines classic flavors with a spooky twist, perfect for your Halloween celebrations.
- Prep Time: 20 minutes
- Cook Time: 70 minutes
- Total Time: 4 hours 90 minutes
- Yield: 12 servings 1x
- Category: Dessert
- Method: Baking
- Cuisine: American
- Diet: Vegetarian
Ingredients
- 1 1/2 cups graham cracker crumbs
- 1/2 cup unsalted butter, melted
- 1 cup granulated sugar
- 4 (8 oz) packages cream cheese, softened
- 1 teaspoon vanilla extract
- 4 large eggs
- 1 cup pumpkin puree
- 1 teaspoon ground cinnamon
- 1/2 teaspoon ground nutmeg
- 1/4 teaspoon ground ginger
- 1/4 teaspoon salt
- 1 cup whipped cream (for topping)
- Halloween-themed decorations (optional)
Instructions
- Preheat the oven to 325°F (160°C).
- In a bowl, combine graham cracker crumbs and melted butter, then press into the bottom of a springform pan.
- In a large mixing bowl, beat the cream cheese and sugar until smooth.
- Add the vanilla extract and mix well.
- Incorporate the eggs one at a time, mixing well after each addition.
- Stir in the pumpkin puree, cinnamon, nutmeg, ginger, and salt until fully combined.
- Pour the cheesecake mixture over the crust in the springform pan.
- Bake for 60-70 minutes or until the center is set but slightly jiggly.
- Turn off the oven and let the cheesecake cool in the oven with the door ajar for 1 hour.
- Refrigerate for at least 4 hours or overnight before serving.
- Top with whipped cream and Halloween decorations before serving.
Notes
- For a firmer cheesecake, bake a little longer.
- Let the cheesecake cool completely before refrigerating.
- Use food coloring to create a spooky effect if desired.
Nutrition
- Serving Size: 1 slice
- Calories: 350
- Sugar: 25g
- Sodium: 300mg
- Fat: 22g
- Saturated Fat: 12g
- Unsaturated Fat: 8g
- Trans Fat: 0g
- Carbohydrates: 30g
- Fiber: 1g
- Protein: 5g
- Cholesterol: 80mg