
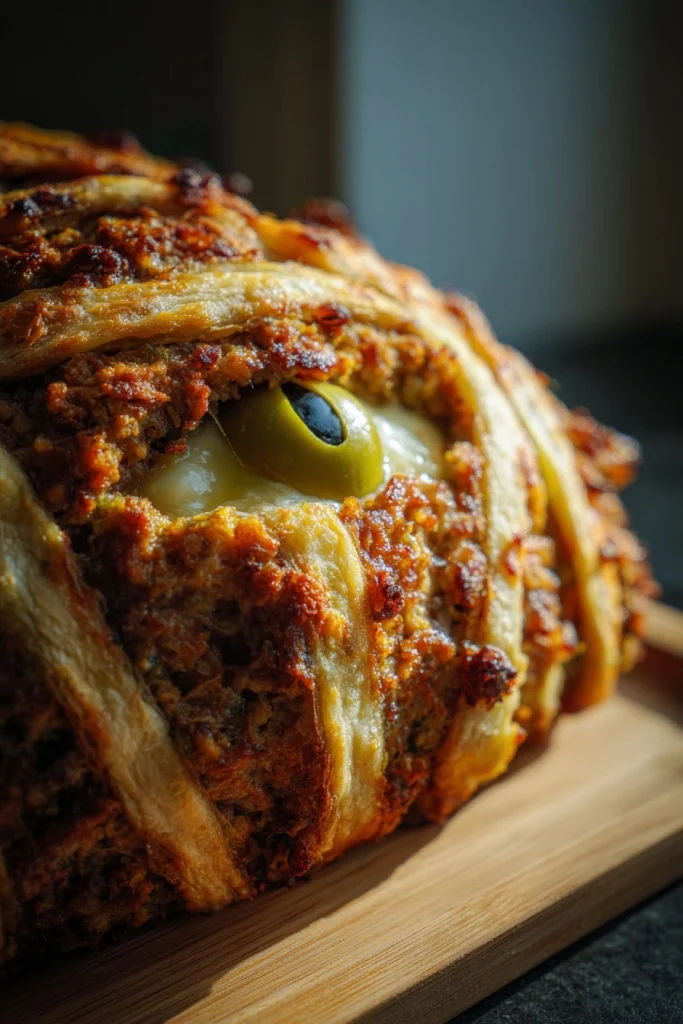
Introduction to Mummy Meatloaf
As a busy mom, I know how challenging it can be to whip up a meal that pleases everyone. That’s why I absolutely adore this Mummy Meatloaf! It’s not just a dish; it’s a fun, festive experience that brings the family together, especially around Halloween. Shaped like a mummy and wrapped in flaky pastry, this recipe is a delightful way to impress your loved ones without spending hours in the kitchen. Plus, it’s a quick solution for those hectic weeknights when you need something delicious and creative. Trust me, your family will love it!
Why You’ll Love This Mummy Meatloaf
This Mummy Meatloaf is a game-changer for busy families! It’s incredibly easy to make, taking just over an hour from start to finish. The taste? Absolutely mouthwatering! With juicy beef and a crispy pastry wrap, it’s a hit with both kids and adults alike. Plus, it’s a fun way to celebrate Halloween without the stress. You’ll find yourself making this dish again and again, even beyond spooky season!
Ingredients for Mummy Meatloaf
Gathering the right ingredients is key to making this Mummy Meatloaf a success. Here’s what you’ll need:
- Ground beef: The star of the show! It provides a rich flavor and juicy texture.
- Breadcrumbs: These help bind the meatloaf together, giving it a nice structure.
- Onion: Finely chopped, it adds a savory sweetness that enhances the overall taste.
- Milk: A splash of milk keeps the meatloaf moist and tender.
- Egg: This acts as a binder, helping all the ingredients stick together.
- Garlic powder: A sprinkle of this adds a delightful depth of flavor.
- Salt and pepper: Essential seasonings that elevate the taste of the meatloaf.
- Crescent roll dough: This flaky pastry wraps around the meatloaf, creating that mummy effect.
- Olives: Sliced olives serve as spooky eyes, adding a fun touch to your dish.
For those looking to spice things up, consider adding chili powder to the meat mixture for a kick! You can find all the exact quantities for these ingredients at the bottom of the article, ready for printing. Happy cooking!
How to Make Mummy Meatloaf
Now that you have all your ingredients ready, let’s dive into the fun part—making this Mummy Meatloaf! Follow these simple steps, and you’ll have a spooky yet delicious dinner in no time.
Step 1: Preheat the Oven
First things first, preheat your oven to 350°F (175°C). Preheating is crucial because it ensures even cooking. You want that meatloaf to bake perfectly, not end up dry or undercooked. So, let that oven warm up while you prepare the rest!
Step 2: Prepare the Meat Mixture
In a large bowl, combine the ground beef, breadcrumbs, chopped onion, milk, egg, garlic powder, salt, and pepper. I like to use my hands for this part; it’s the best way to mix everything thoroughly. Just make sure your hands are clean! Mix until everything is well combined, but don’t overdo it. You want a tender meatloaf, not a dense brick!
Step 3: Shape the Meatloaf
Now, it’s time to shape your meat mixture into a loaf. Place it on a baking sheet lined with parchment paper for easy cleanup. I usually form it into a slightly elongated shape, like a football. This helps it cook evenly and gives it that classic meatloaf look!
Step 4: Prepare the Crescent Roll Dough
Unroll the crescent roll dough carefully. It can be a bit tricky, but take your time. Once it’s unrolled, cut it into strips about an inch wide. These strips will create the mummy effect, so don’t worry about making them perfect. A little rustic charm adds to the fun!
Step 5: Wrap the Meatloaf
Now comes the creative part! Take the strips of dough and wrap them around the meatloaf. Overlap them slightly to mimic mummy bandages. Leave a little space for the eyes, and don’t stress if it’s not perfect. The more whimsical, the better! Just make sure the meatloaf is mostly covered.
Step 6: Add the Eyes
For a spooky touch, place the sliced olives on top of the meatloaf where the eyes should be. This little detail adds character and makes your Mummy Meatloaf even more fun. Plus, it’s a great way to get the kids involved—let them help with the eyes!
Step 7: Bake the Mummy Meatloaf
Pop your wrapped meatloaf into the preheated oven and bake for 45-50 minutes. To check for doneness, use a meat thermometer. You want the internal temperature to reach 160°F (70°C). If you don’t have a thermometer, just make sure the juices run clear when you cut into it.
Step 8: Let it Rest
Once it’s done baking, take the meatloaf out of the oven and let it rest for about 5-10 minutes. This step is important! Resting allows the juices to redistribute, making each slice juicy and flavorful. Trust me, it’s worth the wait!
Tips for Success
- Use lean ground beef for a healthier option without sacrificing flavor.
- Don’t overmix the meat mixture; it keeps the meatloaf tender.
- Experiment with different herbs or spices to customize the flavor.
- For a golden crust, brush the dough with a little egg wash before baking.
- Serve with a side of ketchup or your favorite dipping sauce for extra fun!
Equipment Needed
- Baking sheet: A standard one works great, but a cast-iron skillet adds a nice touch.
- Mixing bowl: Any large bowl will do; just make sure it’s sturdy.
- Meat thermometer: Optional, but it ensures perfect doneness.
- Parchment paper: For easy cleanup, but aluminum foil is a good alternative.
Variations
- For a healthier twist, substitute ground turkey or chicken for the beef.
- Add chopped vegetables like bell peppers or carrots to the meat mixture for extra nutrition.
- Try using whole wheat breadcrumbs for a fiber boost.
- For a cheesy version, mix in shredded cheese with the meat mixture.
- Make it gluten-free by using gluten-free breadcrumbs and dough alternatives.
Serving Suggestions
- Pair your Mummy Meatloaf with creamy mashed potatoes for a comforting meal.
- A fresh side salad adds a nice crunch and balances the richness.
- Serve with a spooky-themed drink, like a “witches’ brew” punch.
- For presentation, garnish with parsley or serve on a festive platter.
FAQs about Mummy Meatloaf
Can I make Mummy Meatloaf ahead of time?
Absolutely! You can prepare the meat mixture and shape the loaf a day in advance. Just wrap it tightly in plastic wrap and store it in the fridge. When you’re ready to bake, simply unwrap and follow the baking instructions. It’s a great way to save time on busy nights!
What can I serve with Mummy Meatloaf?
This spooky dish pairs wonderfully with creamy mashed potatoes or a fresh side salad. You can also serve it with roasted vegetables for a colorful plate. Don’t forget a fun drink to match the Halloween theme!
Can I freeze leftovers?
Yes, you can freeze leftover Mummy Meatloaf! Just slice it and store it in an airtight container. It will keep well for up to three months. When you’re ready to enjoy it again, thaw it in the fridge and reheat in the oven.
Is Mummy Meatloaf kid-friendly?
Definitely! Kids love the fun mummy shape and the tasty flavors. You can even let them help with wrapping the dough and placing the olive eyes. It’s a great way to get them involved in the kitchen!
Can I customize the meat mixture?
Of course! Feel free to add your favorite herbs, spices, or even chopped veggies to the meat mixture. This recipe is versatile, so you can make it your own while keeping it delicious!
Final Thoughts
Making Mummy Meatloaf is more than just preparing a meal; it’s about creating memories with your family. The joy on your kids’ faces as they help wrap the dough and place the olive eyes is priceless. This dish transforms an ordinary dinner into a festive celebration, perfect for Halloween or any night you want to add a little fun to the table. Plus, it’s a delicious way to enjoy a classic comfort food. I hope this recipe brings as much joy to your home as it has to mine. Happy cooking, and enjoy every spooky bite!
PrintMummy Meatloaf: A Spooktacular Family Dinner Idea!

Mummy Meatloaf is a fun and festive dish perfect for Halloween, shaped like a mummy and wrapped in pastry.
- Prep Time: 15 minutes
- Cook Time: 50 minutes
- Total Time: 1 hour 5 minutes
- Yield: 6 servings 1x
- Category: Dinner
- Method: Baking
- Cuisine: American
- Diet: Low Fat
Ingredients
- 1 lb ground beef
- 1/2 cup breadcrumbs
- 1/4 cup onion, finely chopped
- 1/4 cup milk
- 1 egg
- 1 tsp garlic powder
- 1 tsp salt
- 1/2 tsp pepper
- 1 package of crescent roll dough
- 2 olives, sliced (for eyes)
Instructions
- Preheat the oven to 350°F (175°C).
- In a large bowl, combine ground beef, breadcrumbs, onion, milk, egg, garlic powder, salt, and pepper.
- Shape the meat mixture into a loaf and place it on a baking sheet.
- Unroll the crescent roll dough and cut it into strips.
- Wrap the strips around the meatloaf to create a mummy effect.
- Place the sliced olives on top for eyes.
- Bake in the preheated oven for 45-50 minutes or until the meatloaf is cooked through.
- Let it rest for a few minutes before slicing and serving.
Notes
- For a spicier version, add some chili powder to the meat mixture.
- Serve with mashed potatoes or a side salad for a complete meal.
- Leftovers can be stored in the refrigerator for up to 3 days.
Nutrition
- Serving Size: 1 slice
- Calories: 250
- Sugar: 1g
- Sodium: 400mg
- Fat: 12g
- Saturated Fat: 4g
- Unsaturated Fat: 6g
- Trans Fat: 0g
- Carbohydrates: 20g
- Fiber: 1g
- Protein: 18g
- Cholesterol: 70mg